Week 14 — Element 6
6.2 Integrate all game elements as required by specifications
6.2 Reading the specification before integration
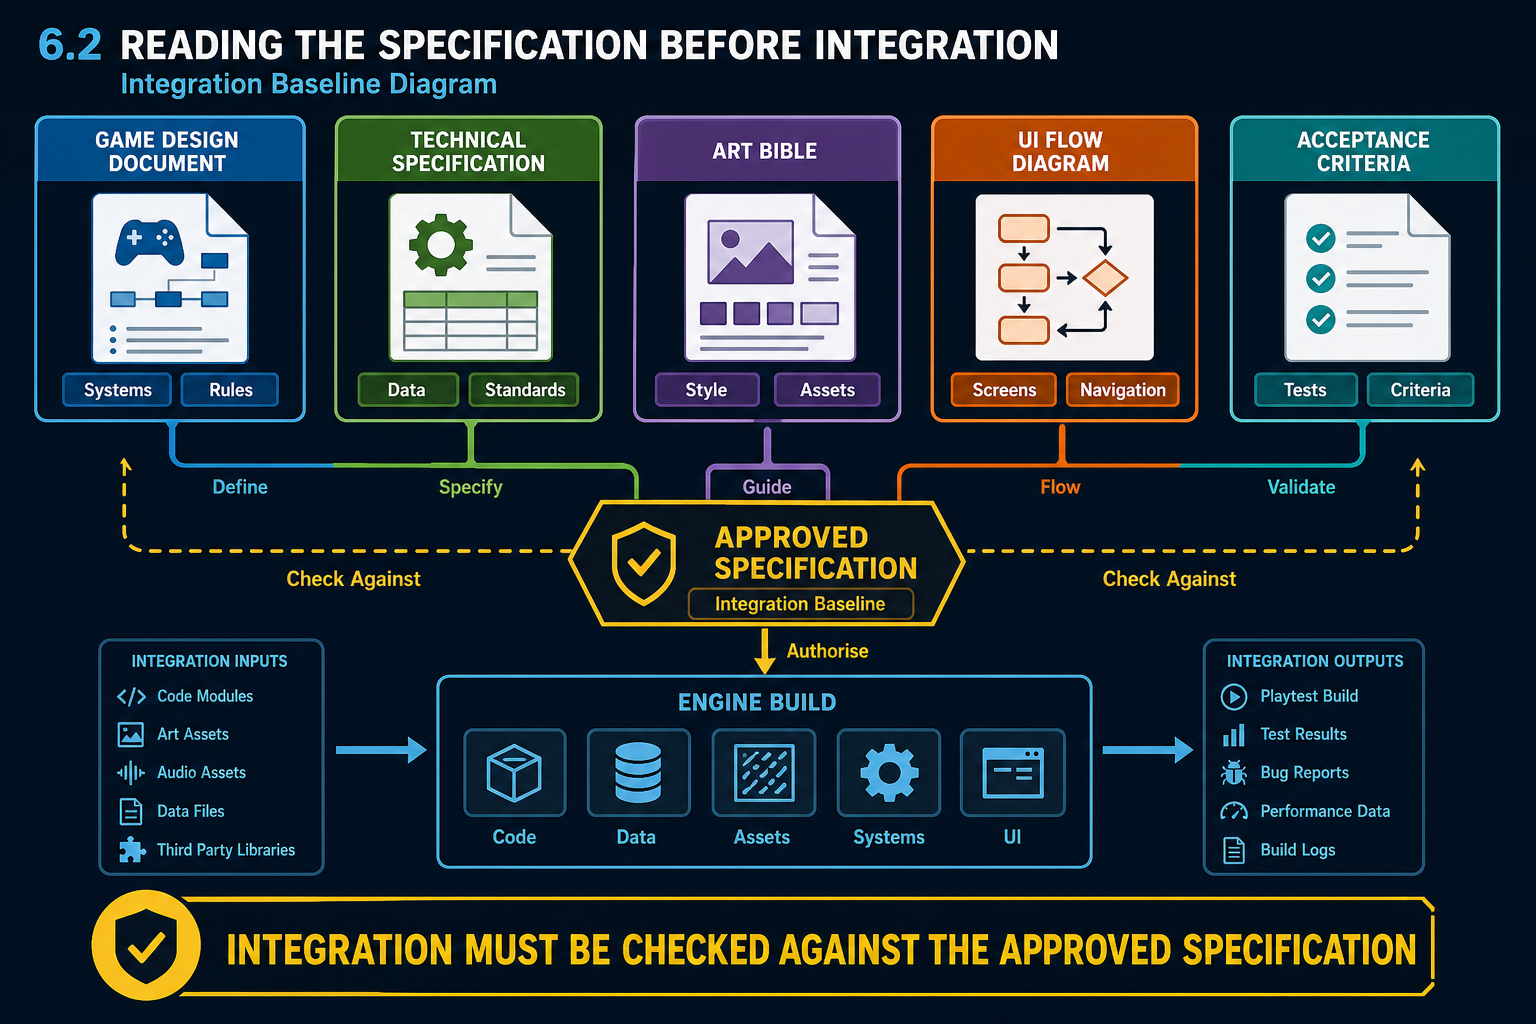
What integration means
To integrate all game elements means to bring the required systems, assets and content together into a working release build that matches the approved specification. For a complex 3-D game, elements may include levels, characters, animation, AI, cameras, physics, UI, menus, audio, lighting, visual effects, save systems, scoring, networking, accessibility options, input mappings and platform-specific build settings.
The baseline is usually the Game Design Document (GDD), technical design documents, art bible, audio brief, user interface flow, platform requirements, sprint backlog and client acceptance criteria. Integration is not simply importing every file into the engine. It is confirming that the right elements are present, connected, configured and behaving as required.
Build a specification checklist
Before merging final content, create an integration checklist from the specification. Include:
- required game modes and levels;
- core mechanics and win/loss conditions;
- character controllers and input devices;
- menus, HUD and pause/settings screens;
- art assets, animation states, materials and VFX;
- audio events, music loops and mixer settings;
- save/load, checkpoints, scoring or progression systems;
- target hardware and software platforms;
- performance targets defined by the project;
- accessibility and localisation requirements if specified;
- required credits, licences, splash screens and legal notices.
This checklist lets you identify missing assets, duplicate versions and risky dependencies early.
Engine capabilities and constraints
Different engines support integration differently. Unity projects commonly use scenes, prefabs, C# scripts, ScriptableObjects, packages and addressable assets. Unreal Engine projects may use maps, Blueprints, C++ classes, data tables, materials, animation blueprints, plugins and packaged content. Both engines can produce high-quality 3-D games, but they have constraints around rendering pipelines, asset formats, shader compatibility, memory, build size, platform support and plugin versions.
For example, Unreal Engine features such as Nanite and Lumen can support high visual fidelity, but they may impose hardware demands and may not suit every target platform. Unity’s flexibility and lighter architecture can help with scalable projects, but render pipeline choices and package versions must be managed carefully. Integration decisions must reflect the actual target hardware, not just the developer’s workstation.
Translating a specification into tasks
A specification item often hides several tasks. "Add vehicle interaction" may require vehicle mesh import, collision setup, entry trigger, animation, camera change, input mapping, audio cues, UI prompt, fuel or damage data, save state and exit behaviour. Break large specification items into technical sub-tasks so nothing is missed during final integration. This is also how you identify dependencies and protect the schedule.
Workplace example
An Adelaide studio is integrating a 3-D mining safety simulator. The specification requires a desktop PC build with keyboard, mouse and gamepad support. During integration, the team discovers the prototype used only Xbox-style gamepad prompts. The final build must include keyboard prompts and remapping because the client’s training lab uses standard PCs. The issue is not a new feature; it is a specification requirement.
6.2 Integrating assets and systems
Asset integration fundamentals
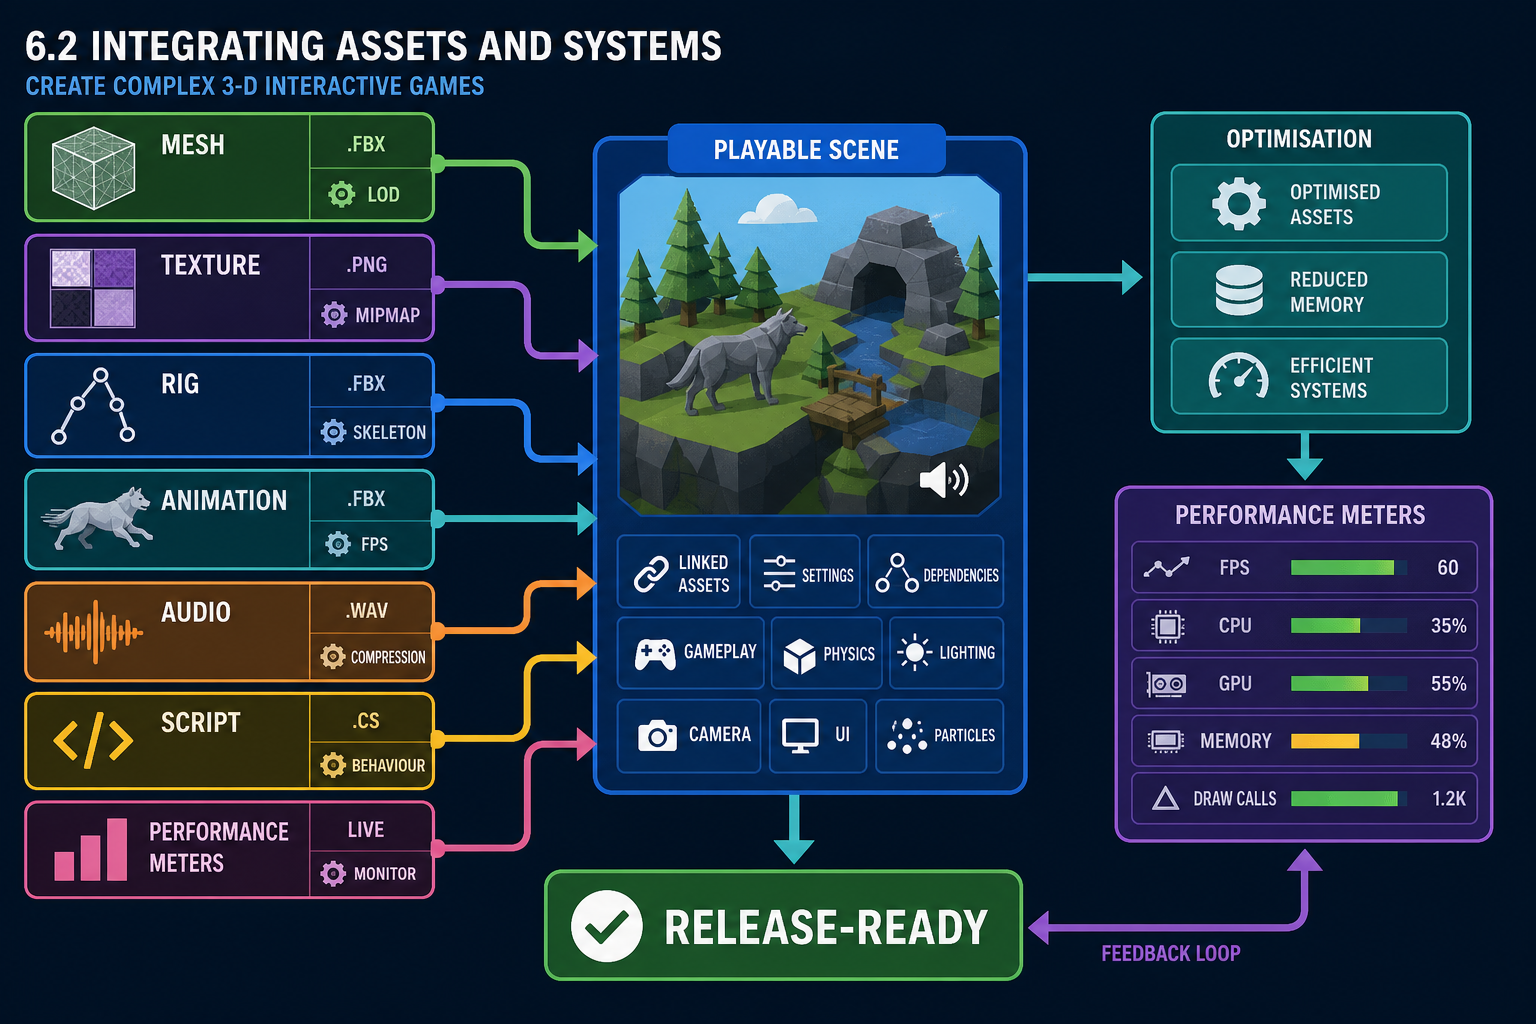
Game assets are usable only when the engine can import, reference, load and render or play them correctly. Common 3-D asset types include meshes, textures, materials, rigs, animations, particle effects, audio clips, UI images, fonts, scripts and data files. Integration requires attention to formats and settings.
Typical formats include FBX or glTF for 3-D models, PNG or TGA for textures, WAV or compressed formats for audio, and engine-native assets such as Unity prefabs or Unreal Blueprints. Organisational procedures may specify naming conventions, folder structures, polygon budgets, texture sizes, compression settings and version control rules.
Step-by-step integration procedure
A disciplined process is:
- Confirm the asset is approved and licensed.
- Check naming, folder location and version number.
- Import using project settings for scale, units, orientation and compression.
- Connect materials, textures, rigs, colliders, animation clips and audio events.
- Place or reference the asset in the correct scene, map, prefab, Blueprint or data table.
- Test in play mode, not just in the editor viewport.
- Profile performance and memory where the asset is used.
- Document any changes to settings or dependencies.
Common integration issues
Frequent problems include missing material links, incorrect scale, inverted normals, broken animation rigs, audio clipping, oversized textures, inconsistent naming, duplicate assets, unsupported shader features, plugin conflicts and scripts referencing deleted objects. A build may work in the editor but fail in a packaged version because a scene was not included in build settings or an asset is loaded by an editor-only path.
For complex 3-D games, integration also involves systems. AI needs a navigation mesh. Doors need triggers and animation states. A weapon needs mesh, animation, sound, VFX, inventory logic, UI icon and balancing data. A menu needs input focus, transitions, accessibility settings and audio feedback.
Hardware constraints
Target hardware imposes technical limits on CPU, GPU, memory, storage, input devices and display resolution. A student developing on a high-end gaming PC may not notice that a scene stutters on the minimum laptop specified by the course or client. Texture memory, real-time lights, physics objects, particle counts and draw calls can all affect performance. Integration should include profiling and optimisation, not just visual checking.
Asset optimisation choices
Optimisation is a trade-off between visual quality, performance and production time. Reducing texture size can improve memory use but may make close-up objects look poor. Baking lighting can improve runtime performance but increases build preparation time and may reduce dynamic lighting flexibility. Using level-of-detail models can help large scenes, but each LOD must be checked for popping, silhouette quality and correct material assignment.
Australian workplace example
A Perth studio integrates photogrammetry rock assets into an environmental game. They look excellent but contain very high polygon counts and 8K textures. On the client’s standard training laptops the level loads slowly and drops frames. The team creates lower-detail meshes, compresses textures and uses level-of-detail settings. The creative requirement is preserved, but the technical requirement becomes achievable.
6.2 Integrating gameplay, UI and audio
Integrating player-facing systems
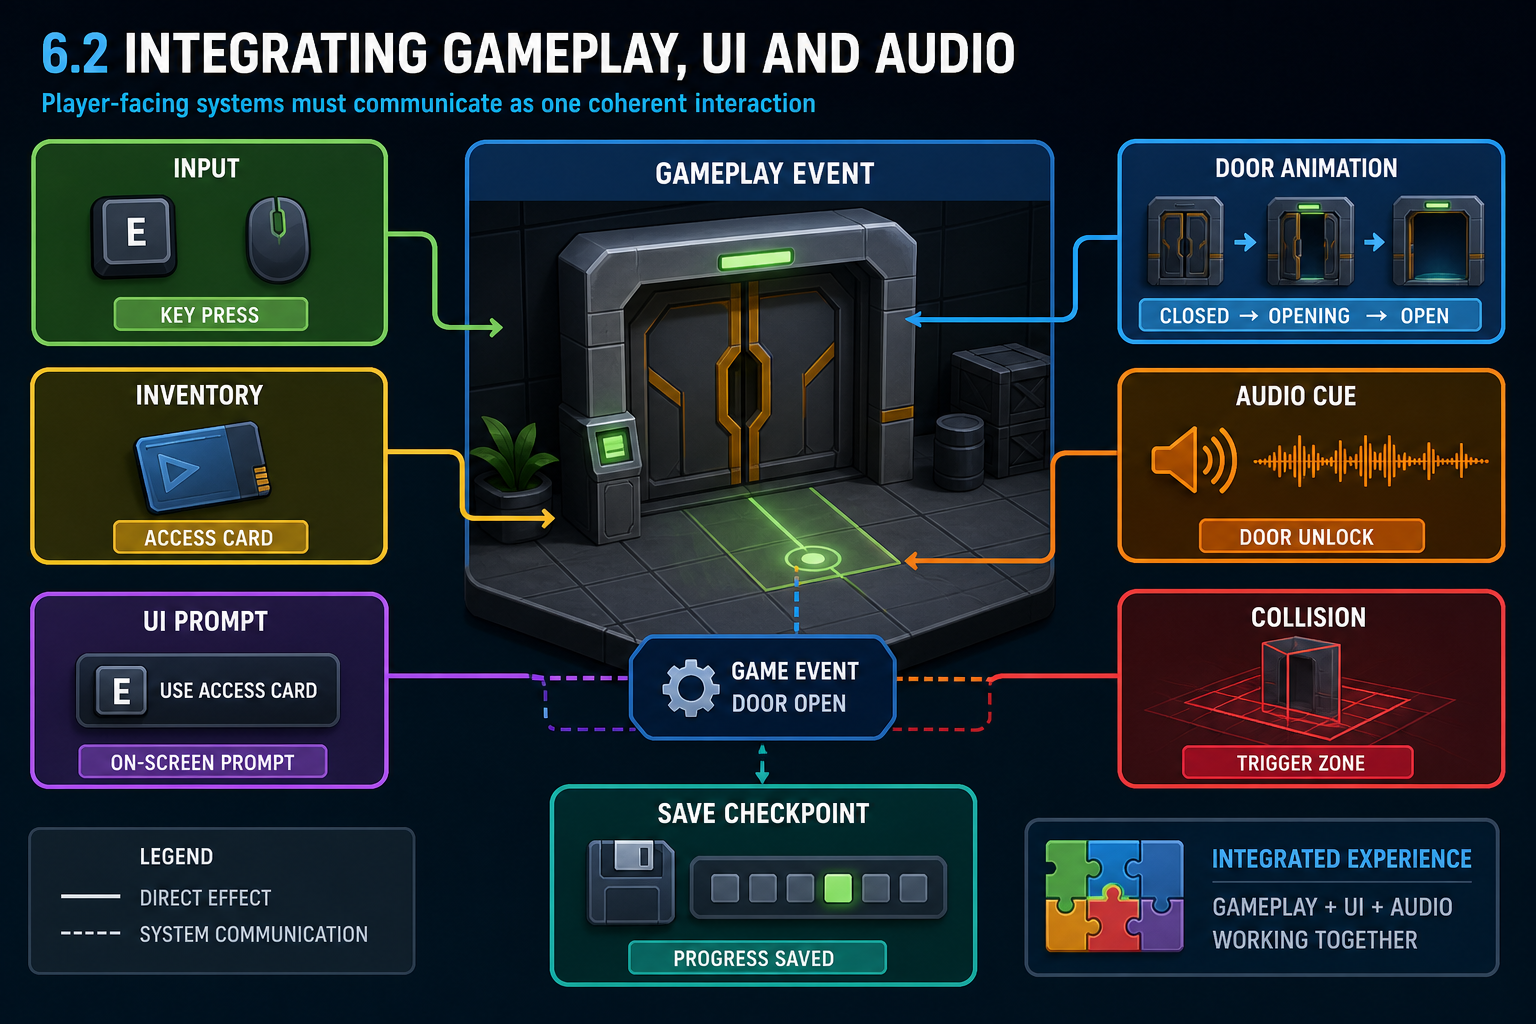
A game element is not integrated merely because it exists. It must contribute to a coherent player experience. Gameplay mechanics, UI, audio and feedback systems must communicate clearly with one another.
For example, a locked door system may require:
- player input detection;
- key inventory or objective state;
- door animation;
- collision changes;
- sound effects;
- UI prompt;
- subtitle or text feedback if specified;
- save/checkpoint update;
- fallback message if the player lacks the key.
If any part is missing, players may think the game is broken.
UI and navigation integration
Menus, HUD and in-game prompts must match the approved UI flow and navigation design. Check that controller, keyboard and mouse inputs work as specified. Confirm focus order, highlighted selections, back/cancel behaviour, pause behaviour, settings persistence and safe return to gameplay. Where accessibility features are specified, integrate them into actual gameplay and menus, not as separate unused screens.
Inclusive design practices may include readable text, remappable controls, captions, adjustable sensitivity, colour-independent cues and reduced motion options. For public-facing or education/training products in Australia, accessibility should be considered seriously in light of the Disability Discrimination Act 1992 and organisational accessibility policies.
Audio integration
Audio is often integrated late and can create unexpected defects. Check music transitions, ambient loops, spatial audio, occlusion, volume mixing, UI sounds, combat sounds, voice-over, subtitles and platform output devices. Audio should reinforce player feedback without masking important cues. Also confirm licences for music, sound effects and voice recordings.
Progression, save and failure states
Final integration must include non-glamorous systems that protect the player journey: checkpointing, save/load, level unlocks, scoring, death/respawn, objective tracking and fail conditions. Many softlocks occur when these systems are not connected correctly. A softlock means the game is still running but the player cannot progress, such as saving after an essential item has disappeared.
Integration test scenario
When testing an integrated interaction, write a scenario that crosses systems. For the locked door example, test collecting the key, seeing the HUD update, hearing the pickup sound, saving, quitting, reloading, opening the door, triggering the animation, and confirming the next checkpoint. Then test the negative path: attempt the door without the key and confirm the prompt, audio and objective text are helpful. This reveals problems that isolated asset tests miss.
Workplace example
A Sydney studio builds a 3-D puzzle game for a museum touchscreen. The puzzle logic is complete, but children in trials repeatedly press the home icon by accident and lose progress. Integration requires UI confirmation, autosave and clear audio feedback. The change touches UI, save state, audio and interaction design, so it must be tested as an integrated sequence, not as isolated assets.
6.2 Confirming feature completeness
Feature-complete integration
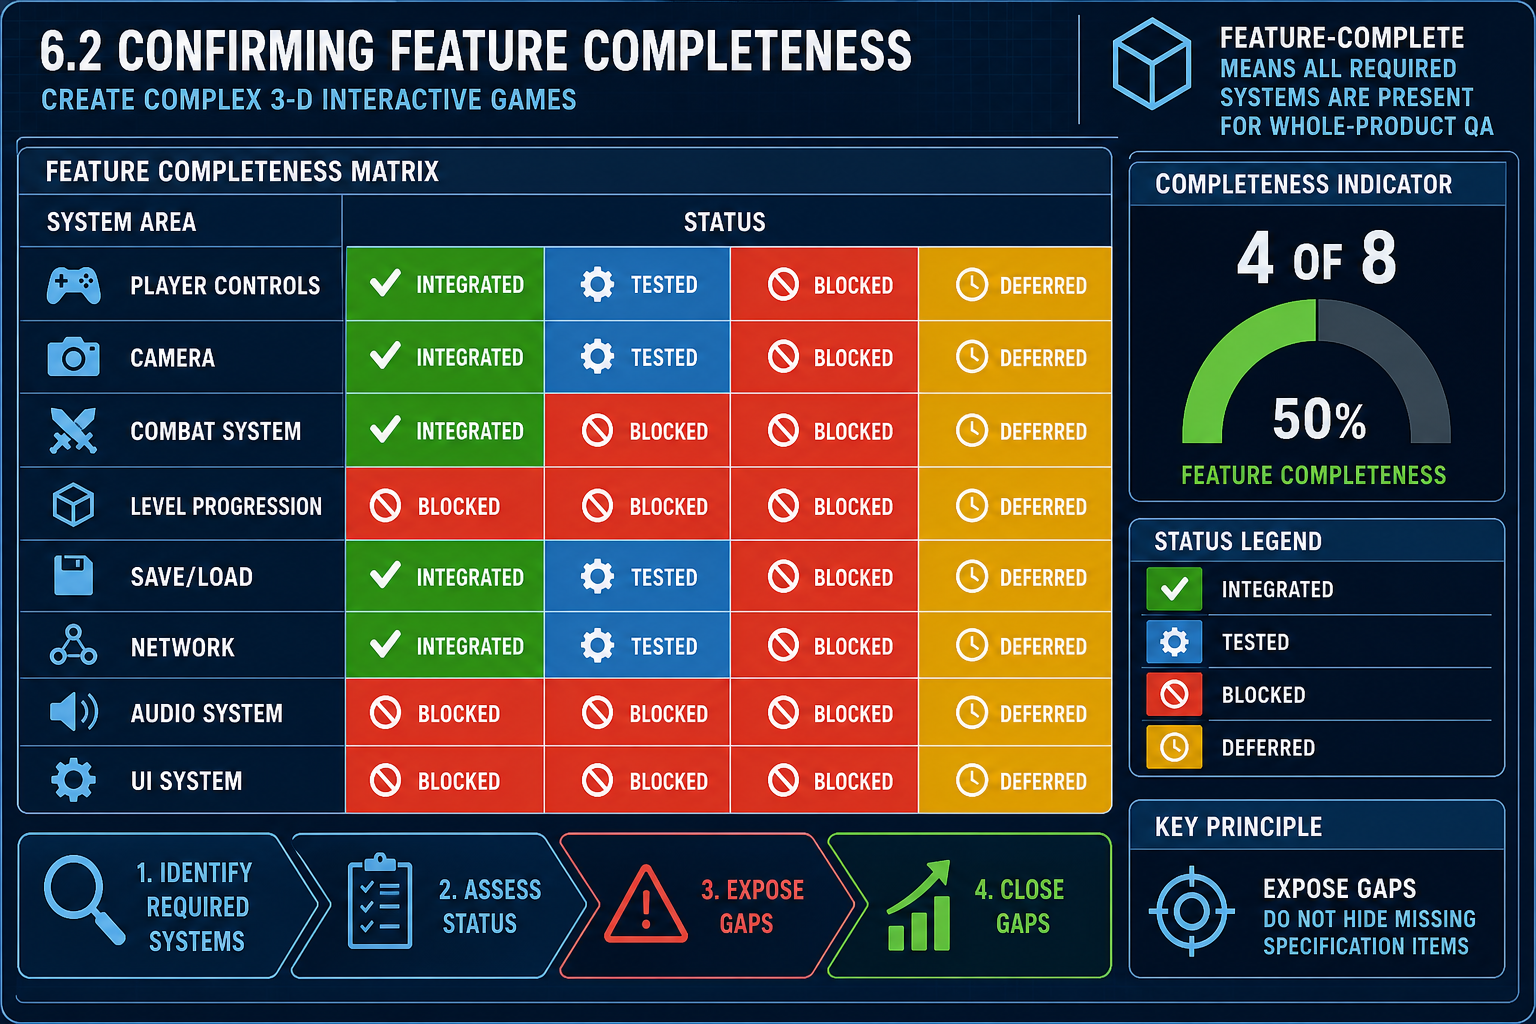
In game development terminology, an alpha build is often described as feature-complete: the planned systems for the release are present, even if they still need bug fixing, optimisation and polish. By the time you transform the prototype into final publication, your build should move beyond experimental fragments into a complete product candidate.
Feature completeness does not mean there are no bugs. It means all required elements are in the build so QA can test the product as a whole. If the final boss, options menu, save system or tutorial level is missing, testers cannot validate the full experience.
Gap analysis
Use a gap analysis against the specification:
- List every required feature, asset group and platform output.
- Mark each as present, integrated, tested, blocked or deferred.
- Identify dependencies, such as "voice-over cannot be finalised until script approval".
- Assign owners and due dates for remaining gaps.
- Escalate anything that threatens the release milestone.
This supports critical path management. The critical path is the sequence of tasks that determines the earliest possible completion date. If final animation export is required before combat integration, and combat integration is required before QA, animation delay becomes a release risk.
Avoiding false completeness
A common mistake is counting a feature as complete because a prototype version exists. For example, a multiplayer lobby may connect in the editor but fail in packaged builds, have no error messages, lack platform account handling and break after disconnect. That is not final integration.
Another mistake is hiding missing items as "known issues" without approval. If the specification requires a credits screen with third-party licences, it must be integrated or formally approved for removal. Licensing omissions can create legal and reputational risk.
Production scheduling
Use scheduling techniques such as milestone reviews, dependency boards, burn-down charts, build freezes and release candidate checklists. A build freeze restricts changes so QA can stabilise the release. A release candidate is a build believed to be suitable for final approval if it passes validation.
Decision points before final checks
Before moving into final QA, ask three release questions. First, can a player complete the required experience from start to finish? Second, can the target platform run the experience using the intended input and performance settings? Third, can the organisation legally and procedurally distribute every included component? If the answer to any of these is no, the build is not ready for final publication checks.
Workplace example
A Canberra serious-games team is delivering a defence training prototype turned final module. The GDD requires three scenarios, but only two have voice-over integrated. The team cannot claim final integration. They either complete the third scenario, obtain approved scope change, or document a staged release. The decision must be visible to the producer and client before sign-off.