Week 8 — Elements 3–4
3.4 Customise asset attributes according to game design and chosen game engine
3.4 Customise scale, orientation and materials
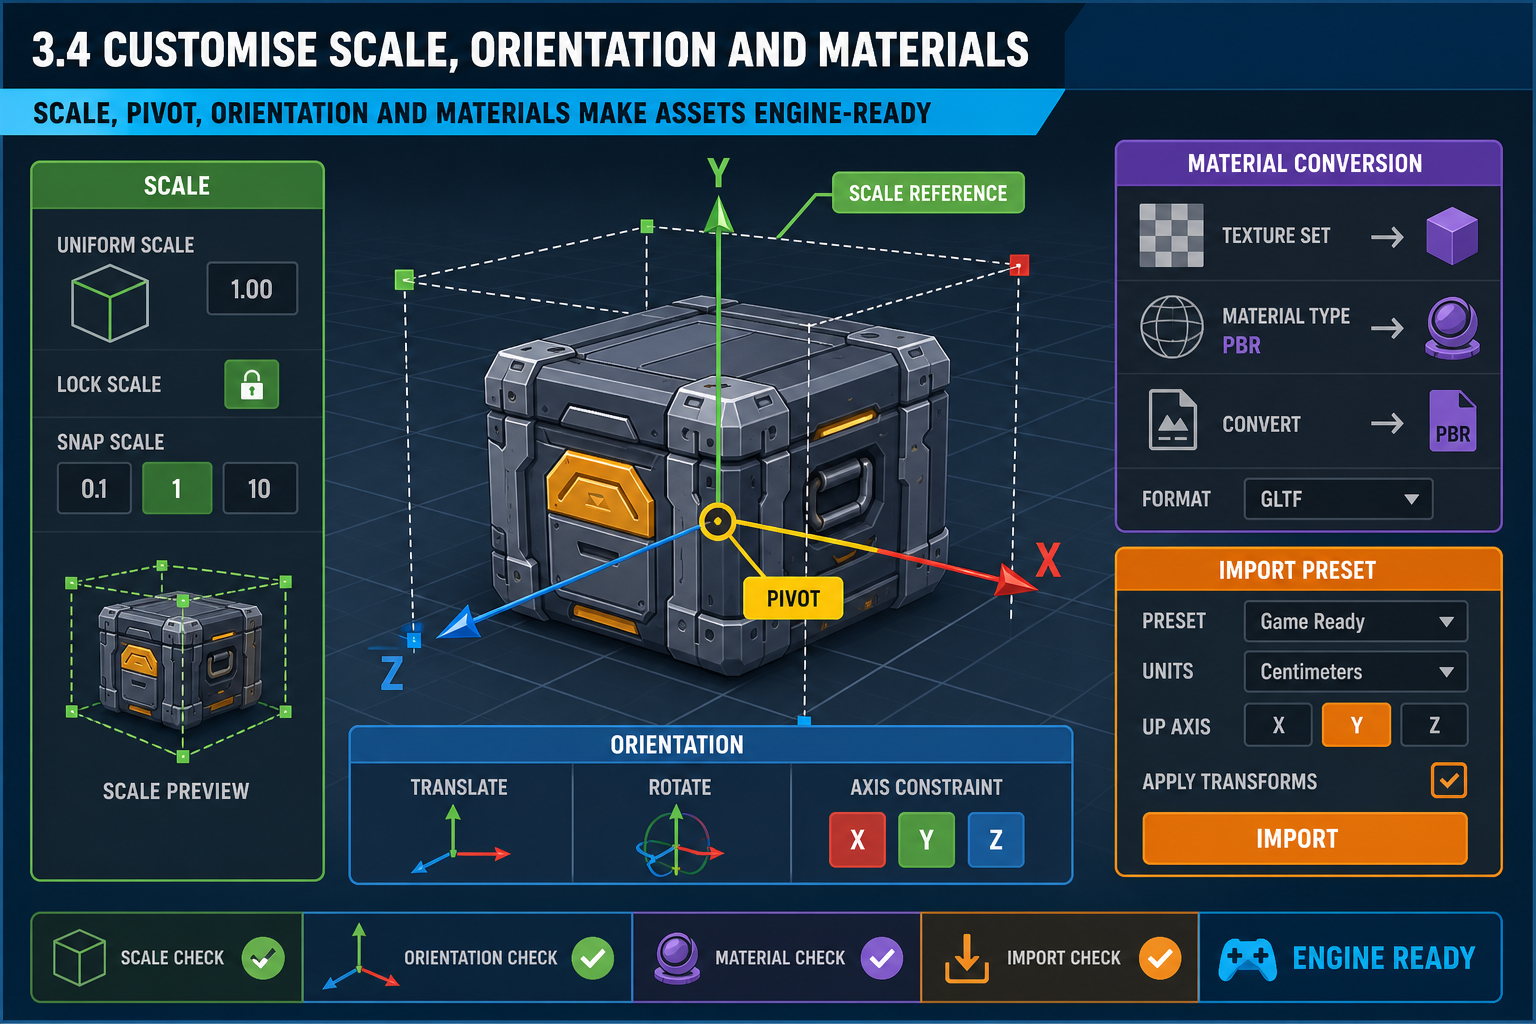
Customisation makes assets engine-ready
After assets are created or acquired, you must customise their attributes according to the game design and chosen engine. Customisation is the controlled adjustment of settings and asset data so the asset behaves correctly in the target project. It is not random tweaking after something looks wrong; it is a planned step in the pipeline.
Start with foundational attributes: scale, orientation, pivot and transforms. If these are wrong, everything built on top of the asset becomes harder. A door with the pivot in the centre will not rotate correctly on hinges. A vehicle with unapplied scale may behave unpredictably in physics. A modular wall that is slightly off-grid may create gaps across a level.
Scale and coordinate systems
Different tools and engines use different unit conventions and coordinate assumptions. Blender commonly uses metres. Unreal Engine uses centimetres. Unity uses metres, but FBX export/import settings can still create scale issues if presets are inconsistent. Customise by using a documented export preset and an engine test scene with reference objects.
Procedure:
- Confirm the project unit and grid standard.
- Apply transforms in the source tool where appropriate.
- Set the pivot for placement or gameplay behaviour.
- Export using the project preset.
- Import using the engine preset.
- Compare with a known character controller, mannequin or measurement cube.
- Correct at the source where possible, not by stacking arbitrary engine scale values.
Materials and shaders
Materials often need conversion. A model from an asset store may use a different shader than your project. A PBR material may include base colour, normal, roughness, metallic and ambient occlusion maps, but your engine shader may require channel packing or different inputs. Transparent, emissive, two-sided or masked materials may have performance implications.
Customise materials by:
- assigning the project’s master material or shader graph
- creating material instances for colour and roughness variation
- connecting texture maps to correct inputs
- checking colour space settings, such as which maps represent colour and which represent data
- reducing unnecessary material slots
- testing under project lighting.
Example
A Tasmanian team imports a purchased rock pack into Unreal. The meshes are visually suitable but use multiple heavy materials. The technical artist creates a project master material, converts the textures, creates material instances for mossy and dry variants, corrects pivot locations for level placement, and checks scale against the player capsule. The asset now matches both design style and engine workflow.
Common mistakes
- Fixing every scale issue by typing random scale values in the engine.
- Leaving pivots at world origin.
- Assuming texture maps are connected correctly after import.
- Using asset-store demo shaders that do not match the project.
- Ignoring material cost because the asset looks acceptable in isolation.
Customisation should make assets consistent, reusable and predictable in gameplay.
3.4 Optimise meshes, textures and memory
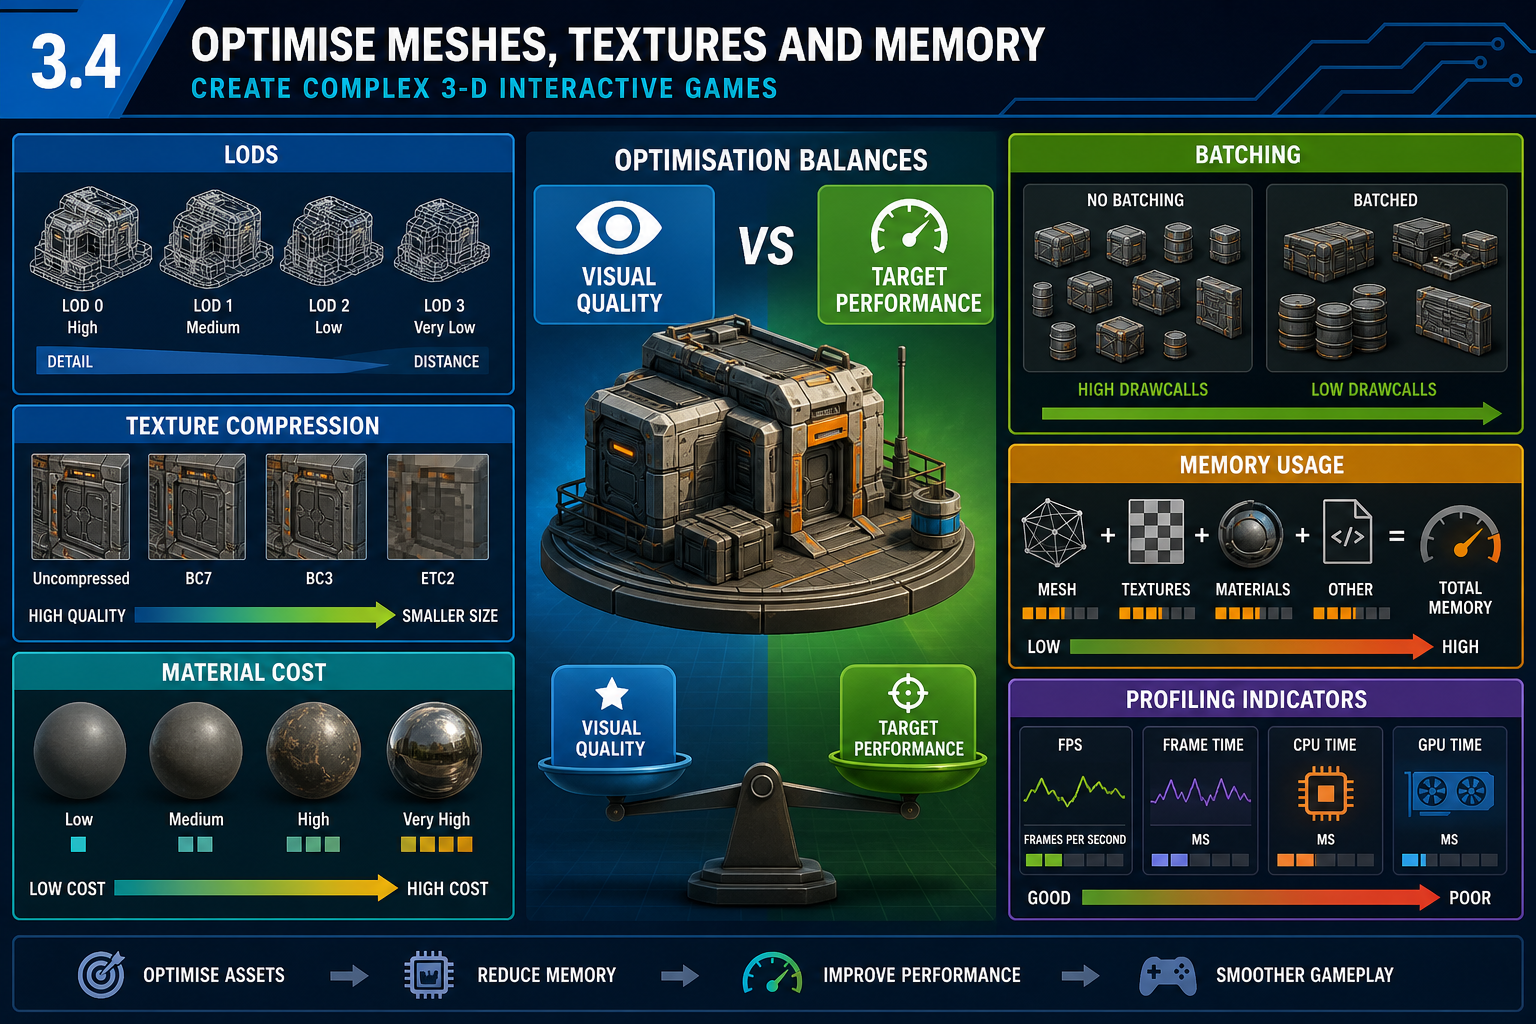
Custom attributes must support performance
Complex 3-D games must balance visual quality with real-time performance. Customising asset attributes includes optimisation: adjusting meshes, textures, materials and import settings so the game can meet its target hardware and gameplay requirements. Optimisation is not simply making everything low quality. It is spending detail where the player sees and uses it, and removing cost where it provides little benefit.
Mesh optimisation
For meshes, consider:
- reducing unnecessary hidden geometry
- using appropriate polygon density for camera distance
- creating levels of detail where the engine and asset type require them
- using instancing or batching-friendly setups for repeated objects
- simplifying collision separately from visual mesh
- checking whether special engine features, such as virtualized geometry, are appropriate for the target platform and asset type.
LOD systems show simpler versions of an asset at distance. They can reduce rendering cost, but they require testing so visual popping is not distracting. Some modern engine features automate parts of geometry detail management, but you still need to measure material cost, memory, unsupported asset types and target platform compatibility.
Texture optimisation
Textures can consume significant memory. Customise texture attributes by reviewing:
- dimensions relative to viewing distance
- compression format chosen by the engine for the target platform
- mipmap generation
- whether alpha channels are needed
- channel packing for data maps
- colour space settings
- texture streaming settings where available.
A tiny prop does not usually need the same texture detail as a first-person weapon. A large hero object seen close to the camera may justify more texture memory. The decision must reflect design priority and hardware constraints.
Material and shader cost
Materials affect GPU work. Transparent materials, complex shader graphs, multiple texture samples, dynamic effects and expensive lighting features can cost more than the mesh itself. Customise materials to use project-approved master shaders where possible. Use material instances or parameters to create variation without duplicating shader complexity.
Example
A Queensland racing game prototype includes roadside trees from a high-quality asset pack. In a test track, hundreds of trees cause performance issues. The team creates LODs, reduces texture sizes for distant foliage, uses simpler materials, groups repeated assets efficiently and tests again on the target laptops. The scene retains the intended look but runs more reliably.
Common mistakes
- Optimising only after the whole level is built.
- Reducing visual quality without measuring the actual bottleneck.
- Using high-resolution textures on small or distant assets.
- Forgetting that collision, physics and animation also cost performance.
- Assuming desktop performance represents all target hardware.
Use engine profiling tools and test builds. Optimisation decisions should be evidence-based, especially for assets on the project’s critical path.
3.4 Configure collision, physics and interaction attributes
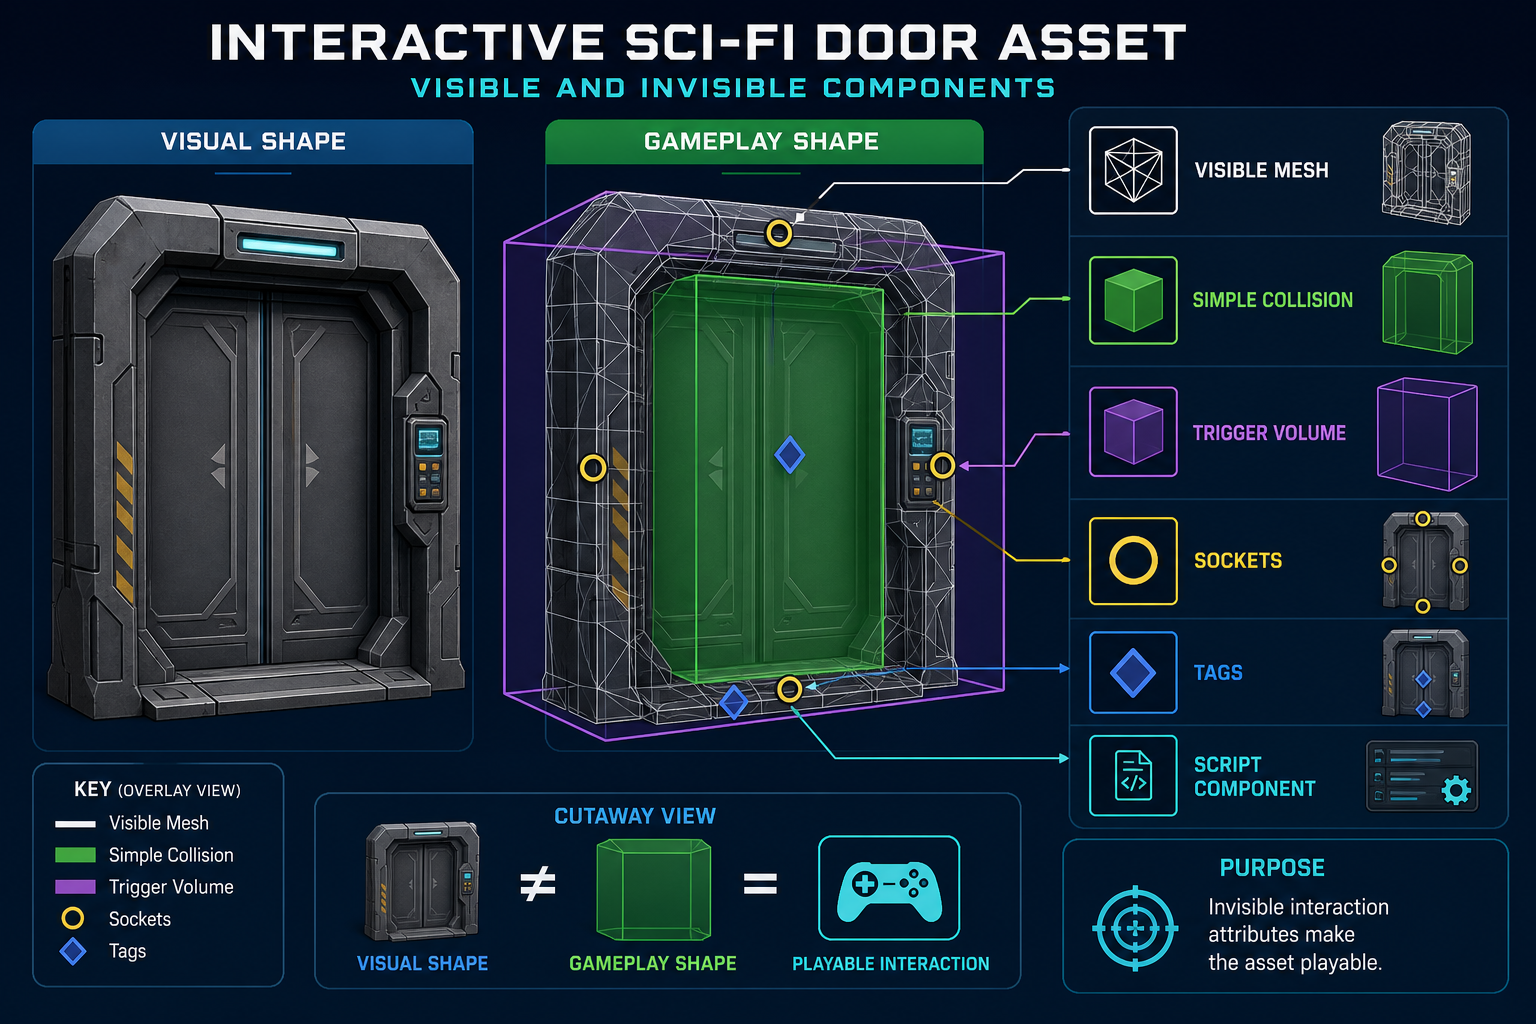
Gameplay attributes make assets interactive
A visual asset becomes part of a game when it interacts with players, AI, physics, navigation or scripts. Customising asset attributes therefore includes collision, physics, sockets, tags, layers, navigation settings and component setup. These attributes are often invisible in screenshots but critical in play.
Collision
Collision defines where objects block, overlap or respond to other objects. It does not always need to match the visual mesh exactly. In fact, simple collision is often better for performance and predictable gameplay.
Common collision approaches include:
- no collision for purely decorative background assets
- simple box, sphere or capsule collision for basic props
- custom simplified collision for irregular objects
- separate hit zones for combat or interaction
- trigger volumes for pickups, doors and events
- physics collision for objects that simulate movement.
Procedure for customising collision:
- Identify the gameplay purpose: block, trigger, hit, climb, drive over or ignore.
- Choose the simplest collision shape that supports that purpose.
- Set collision channels, layers or presets according to the project rules.
- Test with the player controller, AI and projectiles as relevant.
- Check edge cases such as stairs, doorways, tight corridors and moving objects.
- Record any limitations in the asset notes.
Physics and navigation
Physics-enabled assets may need mass, centre of mass, constraints, damping, friction and simulation settings. These should match design intent. A foam box and a steel crate should not behave the same unless the game’s style requires it. For AI movement, assets may need navigation mesh settings so characters can walk around them, through them or on them.
Sockets, tags and components
Many assets need attachment points or metadata. A weapon may need sockets for hands, muzzle flash and shell ejection. A character may need hit sockets or animation notifies. A pickup may need a tag or component so code recognises it. In Unreal, this might be configured in a Blueprint or skeletal mesh asset. In Unity, it might be handled through prefabs, components, tags and layers.
This requires basic programming literacy. You should understand that scripts often refer to asset names, components, variables, events or tags. Changing these without coordination can break gameplay.
Example
A South Australian team creates a sliding sci-fi door. The mesh alone is not enough. The final asset includes a pivot and animation path, collision that blocks the player when closed, a trigger volume, an interaction prompt, audio sockets and a Blueprint or prefab controlling open and close states. The team tests what happens if the player stands in the doorway, if AI tries to pass through, and if the door is triggered repeatedly.
Common mistakes
- Using complex visual mesh collision for every prop.
- Forgetting collision on stairs, ramps or cover objects.
- Setting triggers that block the player unintentionally.
- Changing tags or layers without checking scripts.
- Testing collision only in an empty scene rather than real gameplay.
Interactive attributes must be customised to the design, engine and player experience.
3.4 Validate customised assets in the chosen engine
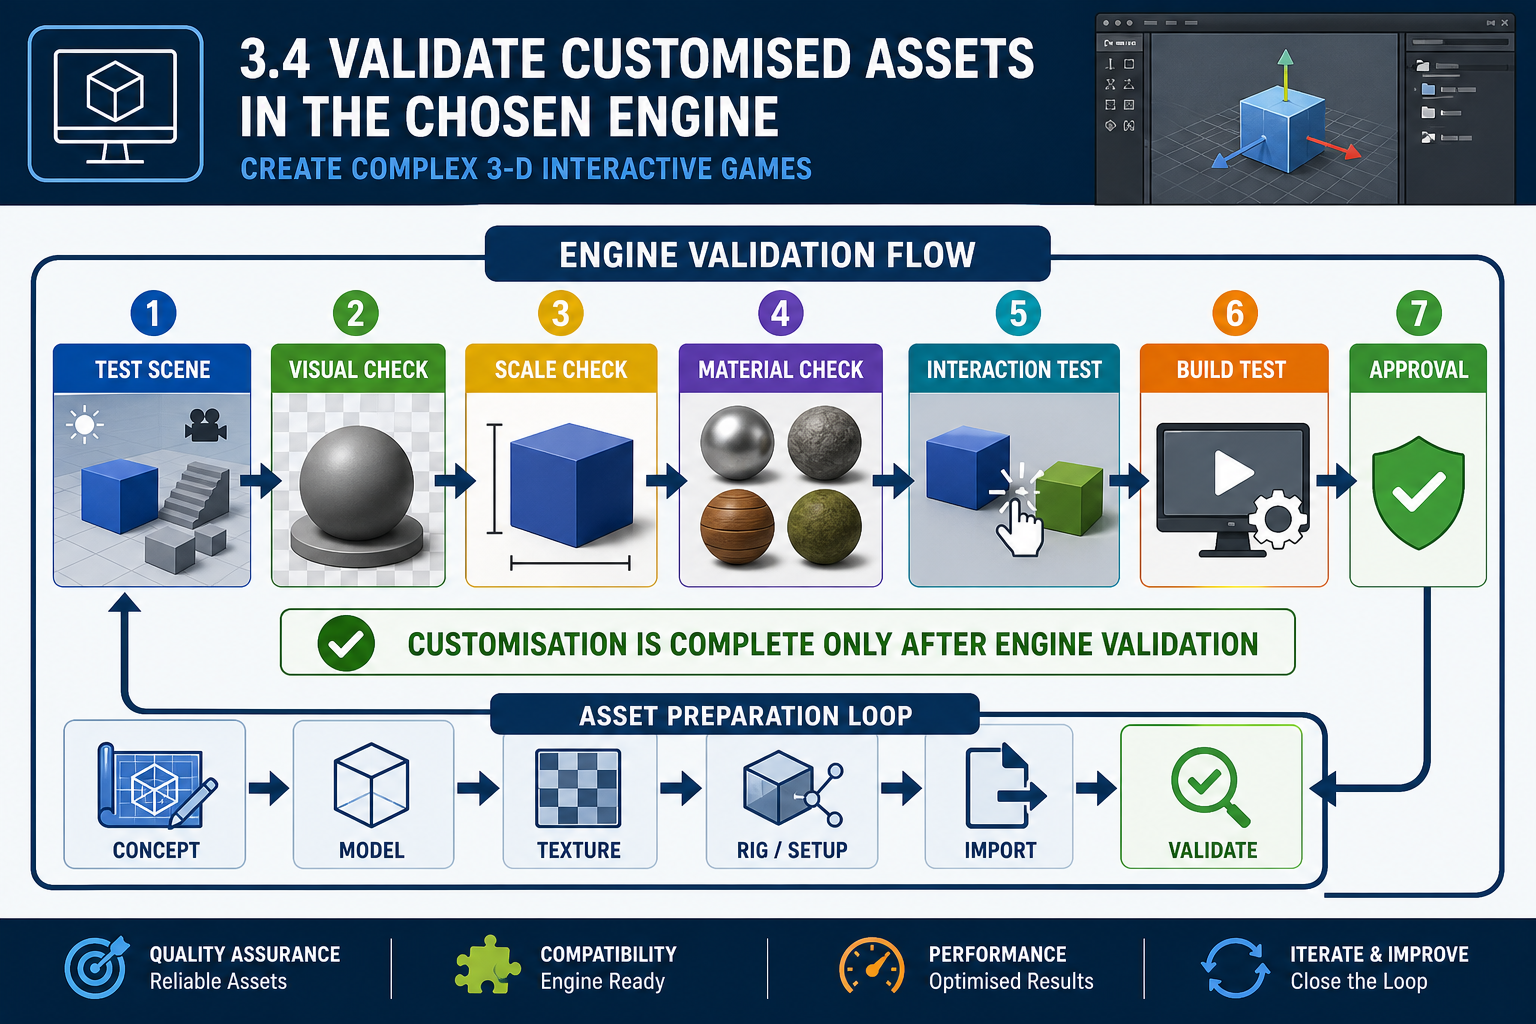
Validation closes the asset preparation loop
Customisation is not complete until the asset is validated in the chosen engine. Validation checks that the customised asset works under real project conditions: correct scene lighting, player controller, camera, scripts, target hardware and build settings. Editor previews are useful, but they do not always reveal build-time, platform or performance issues.
Validation procedure
Use a structured process:
- Place the asset in a representative test scene.
- Check visual appearance under project lighting and post-processing.
- Confirm scale, pivot, orientation and snapping.
- Test materials, textures, LODs and streaming behaviour.
- Test collision, physics, navigation and interaction.
- Run the relevant gameplay scenario.
- Check engine warnings, missing references and import errors.
- Test in a build if the asset affects performance or platform behaviour.
- Record results and update the asset register.
- Commit approved changes with notes.
A representative scene is important. A rock prop may look fine alone but fail when hundreds are scattered across a level. A character animation may work in preview but clip through the environment during gameplay. A UI icon may look sharp in the editor but be unreadable on the target display.
Engine-specific validation
In Unreal, validation may include checking Blueprints, material instances, Nanite or LOD settings, collision presets, physics assets, skeletal mesh import data and map references. In Unity, it may include prefab overrides, materials for the selected render pipeline, import settings, collider components, tags, layers, addressable or asset bundle settings if used, and `.meta` file integrity.
The point is to validate against the actual chosen engine, not a generic idea of game readiness.
Documentation and change control
When custom attributes change, update documentation. If a texture is reduced, record why. If a collision preset changes, note which gameplay system depends on it. If an acquired asset is modified, keep the original and record the modified version. This helps future maintenance and supports team sharing.
Example
A Victorian studio prepares a playable vertical slice. The team validates each final-quality asset in the slice level. One modular wall section has correct visuals but a pivot that prevents grid snapping. Another has a material that compiles differently in the target build. The issues are logged, fixed at source, reimported and approved. Because validation occurs during vertical slice rather than late beta, the same problems do not spread through the full production set.
Common contingencies
If an asset works in the editor but not in a build, check platform import settings, missing plugin dependencies, case-sensitive paths, excluded folders and build logs. If an asset looks different on another team member’s machine, check whether all files were committed, including engine metadata and material dependencies.
Validation ensures customised assets actually meet game design, engine and production requirements.