Week 8 — Elements 3–4
4.1 Create, modify or access scripts or code and combine assets
4.1 Scripts, code and the engine workflow
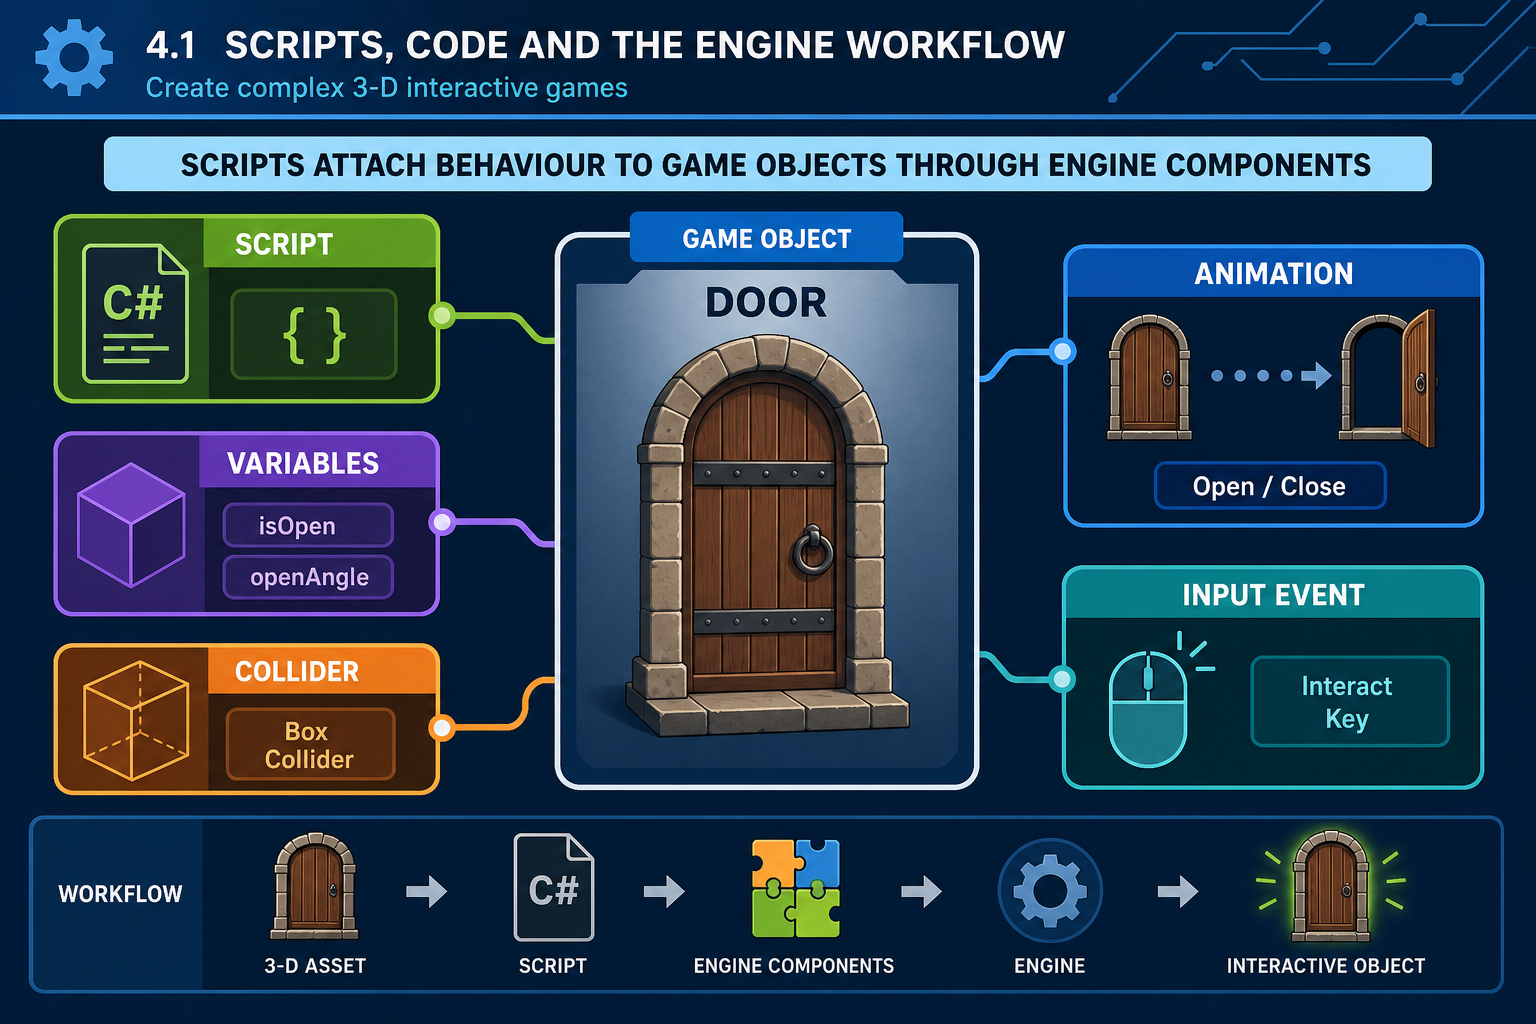
What a script does in a game engine
A script is a file or graph that defines behaviour in the game engine. In many engines, scripts are attached to objects in a scene. A static 3-D model becomes a door, pickup, enemy, lift, projectile or puzzle object when code tells it how to respond to time, input, collision, animation events or game state.
In Unity, common gameplay scripts are written in C# and attached as components to GameObjects. In Unreal Engine, gameplay may be written in C++ or assembled through Blueprints. Other engines use languages such as GDScript, Lua or JavaScript-like scripting. The language differs, but the underlying techniques are similar:
- Variables store values such as speed, health, score, target object, timer duration or audio clip reference.
- Functions or methods group instructions, such as opening a gate or applying damage.
- Events respond to engine activity, such as start-up, update loops, collision, trigger entry, button press or animation completion.
- Conditionals choose between outcomes, for example if the player has a key, unlock the door; otherwise play an error sound.
- Loops repeat work, but must be used carefully because uncontrolled loops can freeze the editor or runtime.
- Object references connect one script to another object, component, prefab, asset or service in the engine.
At this level, you are not expected to write a full commercial gameplay framework alone, but you are expected to create, modify or access code deliberately. That means you can open an existing script, understand its role, change values or logic safely, connect public properties in the editor, and test the result.
A safe procedure for working with scripts
Use a controlled workflow whenever you create or modify code:
- Read the requirement. Identify the behaviour required. For example: “The player must collect three power cells before the exit door opens.”
- Locate existing systems. Check whether the engine project already has inventory, interaction, UI, audio, animation or save systems you should use. Do not duplicate functionality without a reason.
- Create or branch safely. If using Git, Perforce or another version control system, update first and work on the correct branch. If not, make a dated backup before major changes.
- Name the script clearly. Use team naming conventions, such as `DoorController`, `PickupPowerCell` or `PlayerHealth`. Avoid vague names such as `Script1` or `NewBehaviour`.
- Keep the responsibility narrow. One script should have a clear purpose. A door script should not also manage global score, music, player health and level loading unless the design explicitly requires it.
- Expose only useful settings. Designer-adjustable variables, such as movement speed or required pickup count, should be editable in the inspector or details panel. Internal calculations should remain private where appropriate.
- Add comments where they clarify intent. Comments should explain why code exists, not restate obvious lines.
- Test in small steps. Compile, run, trigger the behaviour, read console output, and fix errors before adding more complexity.
Workplace example
A Melbourne indie studio is prototyping a first-person museum exploration game for a cultural institution. The creative requirement says visitors should point at an exhibit and press a key to hear narration. The technical requirement says the interaction must work with keyboard/mouse now and be adaptable to controller input later.
A suitable approach is to create an `InteractableExhibit` script that stores references to the audio clip, subtitle text and highlight material. A separate `PlayerInteractor` script performs a raycast from the camera and calls an interaction function on the exhibit. This separates player input from exhibit behaviour and makes the system easier to extend.
A poor approach would be to place unique keyboard input code on every exhibit. It might work for a demo, but it becomes hard to maintain, hard to adapt for controller input, and likely to produce inconsistent behaviour.
Common mistakes and contingencies
Common script problems include missing object references, spelling or case errors, editing the wrong prefab instance, using update loops for work that should happen only on events, and changing package code that will be overwritten during an update.
If the engine shows compile errors, do not keep adding code. Read the first error, check the file and line number, and fix errors from top to bottom. If a script compiles but behaviour does not occur, check whether it is attached to the correct object, enabled, connected to required references, and called by the expected event.
WHS matters even in an online cohort. Long debugging sessions can lead to fatigue and poor decision-making. Use breaks, an ergonomic workstation and safe electrical setup for student-supplied hardware, consistent with Australian workplace health and safety expectations for computer-based work.
4.1 Creating and modifying scripts deliberately
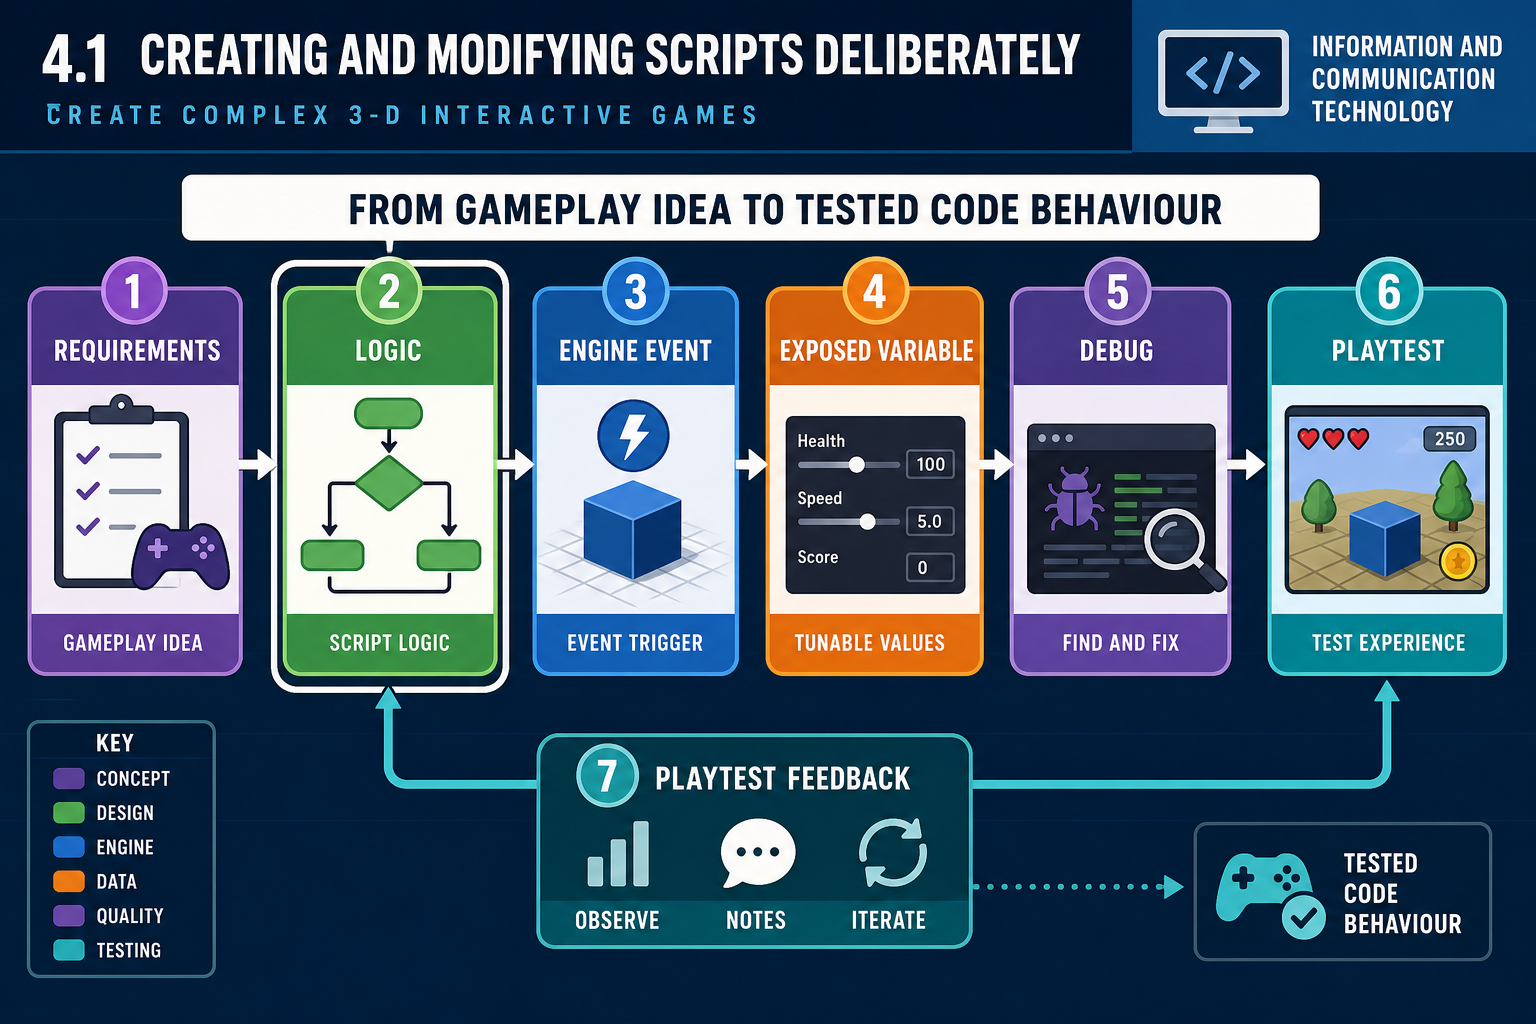
Translating a requirement into code logic
Before creating code, convert the requirement into a small behaviour specification. This prevents guessing and helps you check whether the result is complete.
For example, the requirement “create a pressure plate that opens a gate while the player stands on it” can be broken into logic:
- The pressure plate needs a trigger collider.
- It must detect when the player enters and exits.
- It must tell the gate to move to an open or closed state.
- The gate must play animation or movement over time.
- Audio or visual feedback may be required.
- The behaviour must reset reliably.
This can become two scripts: one on the pressure plate and one on the gate. The pressure plate detects the player and calls functions such as `Open()` and `Close()` on the gate. The gate script manages movement, animation state and sound. This division is easier to test than one large script with mixed responsibilities.
Working with engine lifecycle and events
Game engines provide built-in lifecycle events. In Unity, for example, common events include start-up, per-frame update, physics update and trigger/collision callbacks. In Unreal, actors and components have events such as BeginPlay, Tick, overlap events and input actions. You need to choose the right event for the job.
Use start-up events to initialise references and starting values. Use input events for player commands. Use collision or trigger events for contact-based gameplay. Use per-frame update only when behaviour genuinely needs to be checked continuously, such as camera follow or timed interpolation.
Overusing per-frame update is a common beginner error. If 200 objects each check the same condition every frame, the prototype may still run on a high-end desktop but fail on lower-spec student laptops or target hardware. Event-based code is often cleaner and more efficient.
Designer-tunable values
In production, programmers are not the only people who adjust gameplay. Designers, artists and technical designers often need to tune speeds, distances, delays, damage values, colours, particle effects or audio clips. Use editable properties where the engine supports them.
Good tunable values are:
- clearly named, such as `openSpeed` rather than `x`;
- given safe default values;
- documented by tooltips or comments if the meaning is not obvious;
- constrained where possible, for example by using minimum and maximum ranges;
- stored on prefabs or data assets when many instances share the same settings.
Avoid hard-coding values throughout the script. If the player movement speed is written as the number `7.5` in five different places, tuning becomes error-prone. If it is exposed once as `movementSpeed`, the team can adjust it without breaking unrelated logic.
Debugging and confirming script behaviour
Debugging is part of creating and modifying code, not a separate emergency task. Useful techniques include:
- Read the console. Compilation errors and runtime warnings often explain the fault directly.
- Print diagnostic messages. A temporary console message can confirm that an event fired or a value changed. Remove or disable noisy messages before presentation.
- Inspect values during play. Many engines allow viewing live component values while the game runs.
- Use breakpoints where available. An external IDE can pause execution and show variable values.
- Create a minimal test scene. Isolate a door, pickup or enemy rather than testing only in a complex level.
Australian workplace scenario
An e-learning serious game is being built for a Queensland training provider. The brief requires learners to identify hazards in a virtual workshop. A junior developer modifies a hazard interaction script so hazards highlight when the cursor hovers over them and display feedback when clicked.
The developer checks the technical requirements: the build must run in a browser or on standard student laptops, so the script cannot rely on heavy post-processing or platform-specific input. They expose highlight colour and feedback text so an instructional designer can tune each hazard. They also confirm that any workshop images and audio are licensed for use, because copyright and third-party licence compliance are real production requirements in Australia.
Mistakes to avoid
Do not copy code from the internet without understanding the licence, compatibility and security implications. Do not paste large code blocks into a project and hope they work. Do not change engine package files unless instructed, because package updates may overwrite them. Do not store sensitive credentials or API keys in scripts committed to a shared repository.
When you inherit code, make the smallest change that meets the requirement, test the existing behaviour first, and document the change. This protects the prototype from regression, where a new change breaks previously working gameplay.
4.1 Combining assets into playable objects
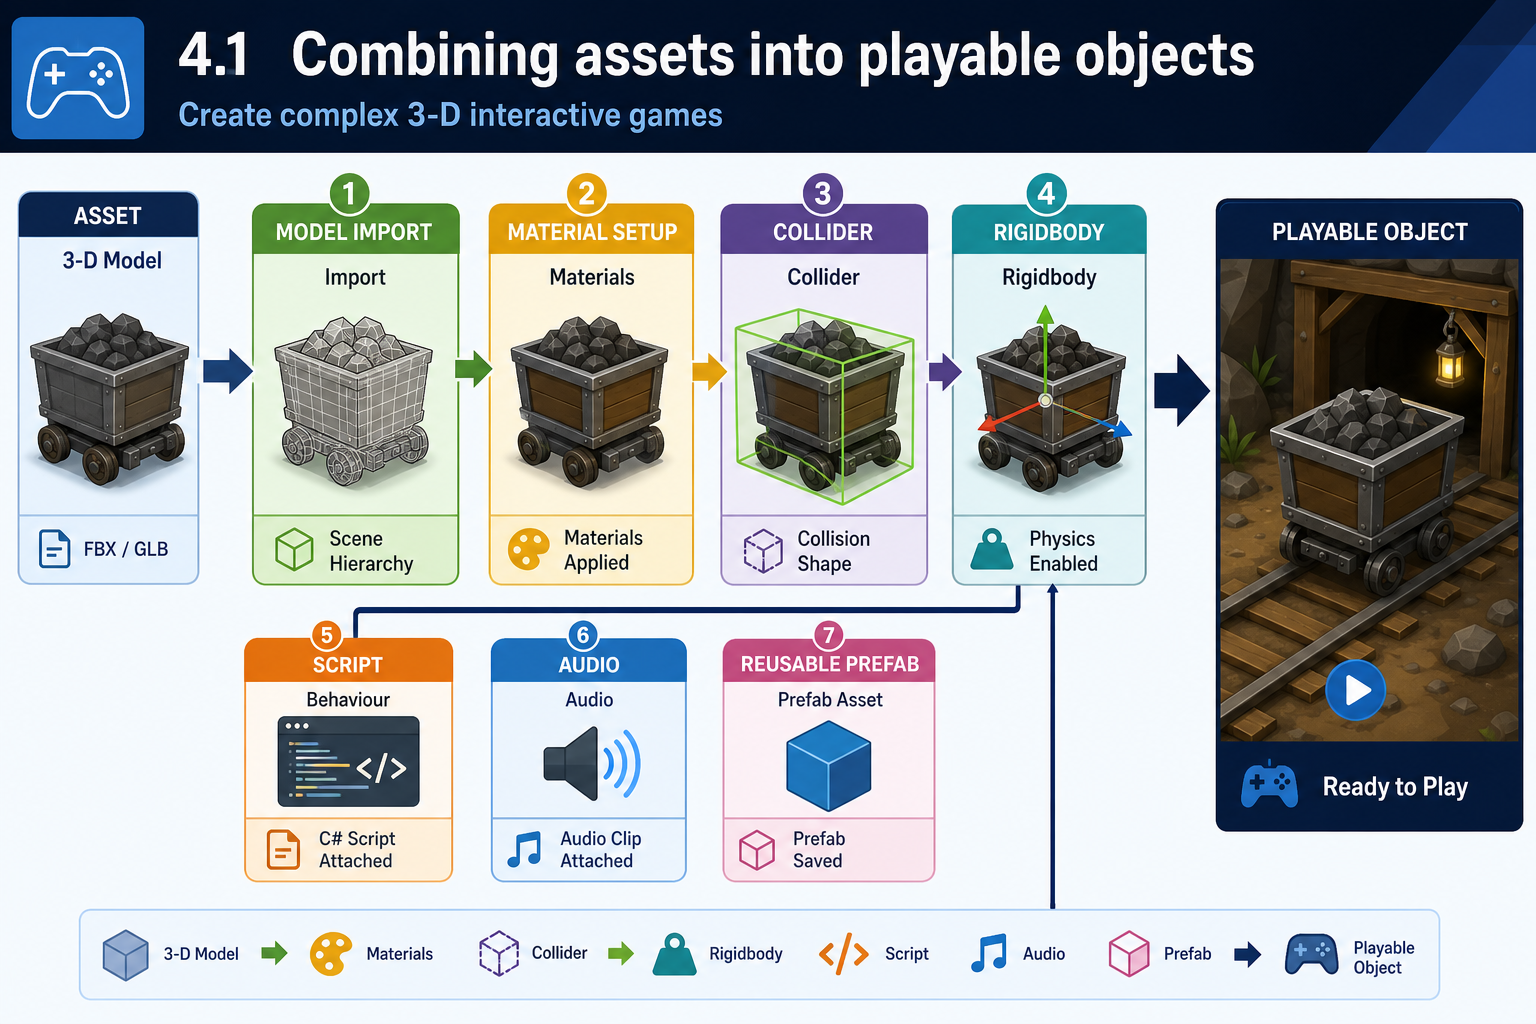
What it means to combine assets
An asset is any media or data used by the game project. In a 3-D game this may include meshes, textures, materials, rigs, animations, audio, scripts, shaders, fonts, particle effects, UI sprites, data tables and prefabs. Combining assets means importing them, configuring them, linking them together and placing them in a form that the engine can use at runtime.
A model file alone is not yet a game object. To become a usable in-game crate, for example, it may need:
- a mesh imported at the correct scale;
- materials connected to texture maps;
- a collider for physics or interaction;
- a rigidbody if it can move physically;
- a script if it can break, be collected or trigger events;
- an audio clip for impact sound;
- a prefab or blueprint so it can be reused consistently.
Game engines are powerful, but they are not magic. Incorrect import settings can create visual errors, performance problems or broken gameplay.
Importing and checking common 3-D assets
Use this procedure when integrating assets:
- Confirm the source and licence. Check whether the asset is original, institution-provided, purchased, open source or client-supplied. Record attribution if required. Australian copyright law applies to models, images, audio and code.
- Place files in the correct project folders. Follow the team’s folder structure, such as `Art/Models`, `Art/Materials`, `Audio`, `Scripts`, `Prefabs`, `Scenes` and `UI`.
- Check file format compatibility. Common formats include FBX or glTF for 3-D models, PNG/TGA/JPEG for textures, WAV/OGG/MP3 for audio depending on use, and engine-native material or prefab formats.
- Review scale and orientation. A door imported ten times too large or rotated 90 degrees may break level flow and collision.
- Assign materials and textures. Check albedo/base colour, normal, metallic, roughness/smoothness and emission maps according to the engine’s material system.
- Configure colliders. Use simple colliders where possible. Mesh colliders are more expensive and not always appropriate for moving objects.
- Create a reusable asset. In Unity this may be a prefab; in Unreal, a Blueprint class or actor setup. Reuse prevents inconsistent copies.
- Test in a scene. View the asset under game lighting, collide with it, interact with it and check console warnings.
Asset integration issues
Common issues include missing textures, pink or default materials, flipped normals, wrong pivot points, incorrect animation rig settings, excessive polygon counts, oversized texture resolution, uncompressed audio, inconsistent naming and broken references after moving files outside the engine.
The engine’s asset database tracks files and metadata. Moving or renaming files through the operating system can break references in some workflows. Use the engine’s project panel or agreed source control process unless the team’s pipeline says otherwise.
Workplace example
A Sydney training simulation team receives a 3-D forklift model from an external artist. The creative requirement is that the forklift sits in the warehouse as a recognisable hazard. The technical requirement is that the scene must run smoothly on mid-range laptops used by TAFE students.
On import, the developer finds the model has very high polygon detail, 4K textures and no simple collider. For a background hazard, that is excessive. The developer creates a lower-detail version or asks the artist for an optimised export, reduces texture size where acceptable, creates a box collider for interaction, and builds a prefab with a hazard script and UI prompt. The result meets the visual requirement without overloading the hardware.
Professional and legal context
Combining assets is also a compliance activity. Do not use unlicensed music, models, fonts or texture packs in a prototype intended for presentation. Even if the build is “only for assessment”, you must follow institutional policy and the terms of the asset licence. Keep evidence of asset sources in an asset register or credits file. This is good professional practice and protects the client, education provider and development team.
For online learners working on personal hardware, also consider storage and backup risk. Large 3-D assets can fill drives quickly. Use version control with appropriate large-file support where available, and avoid committing temporary build folders or cache directories.
4.1 Combining code and assets through reusable systems
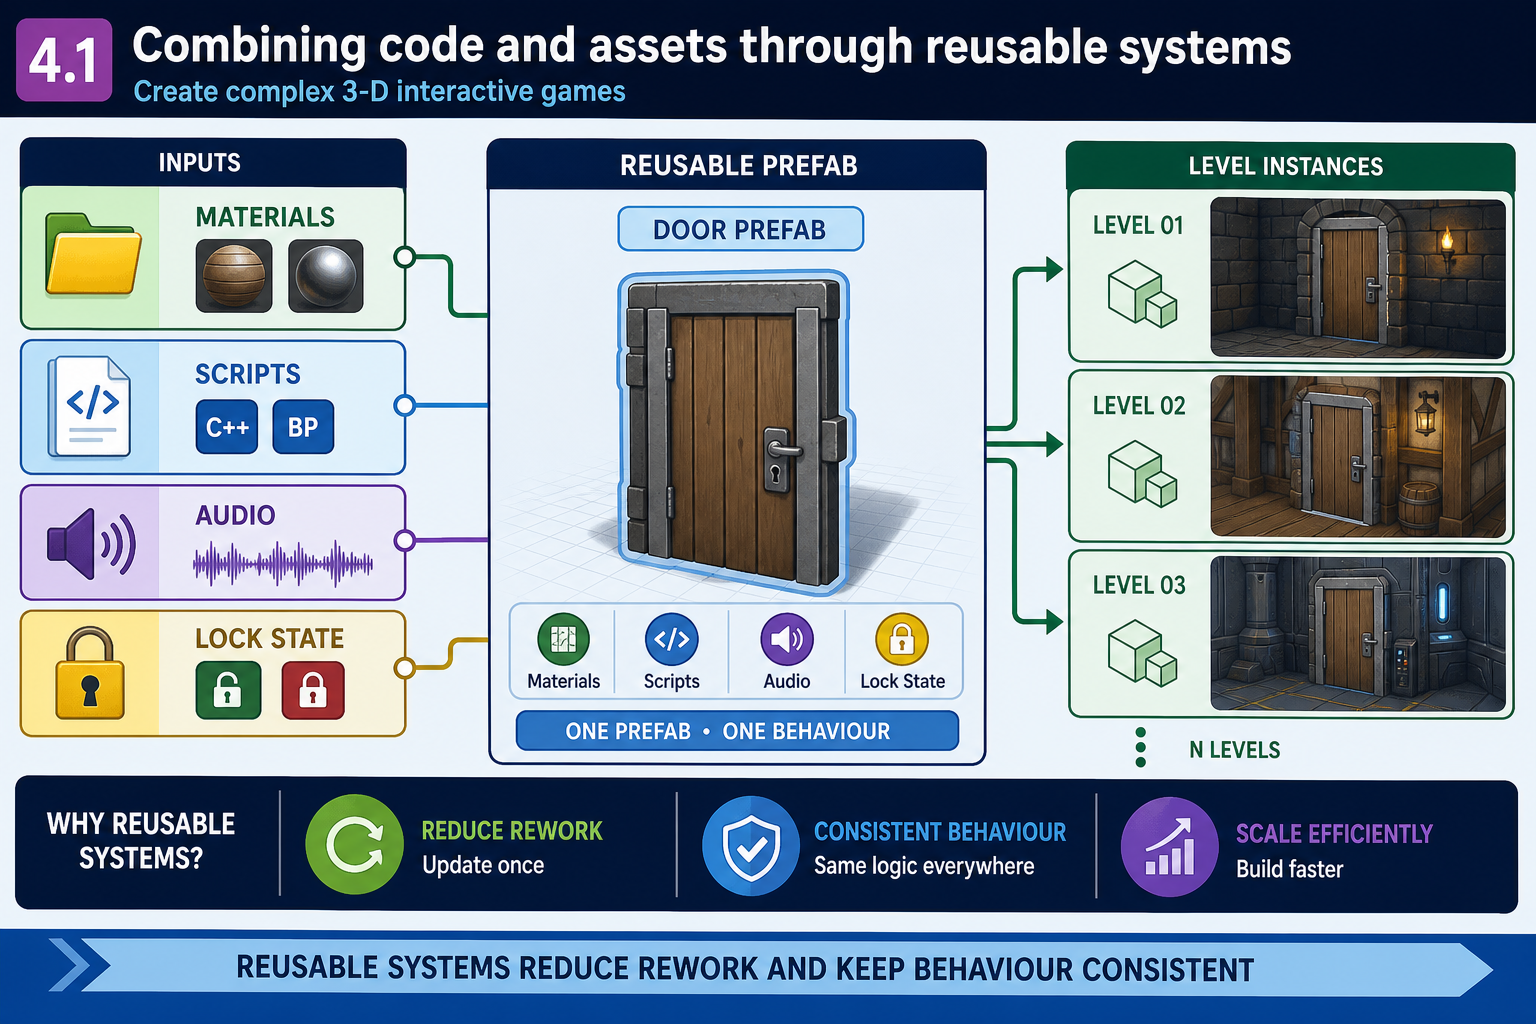
Reusable game objects
Once assets and scripts work together, convert them into reusable systems. This is a core production skill. A prototype built from reusable prefabs, Blueprints, scenes, data assets and components is easier to expand than one built from one-off objects.
A prefab or equivalent reusable object stores a configured game object with its components, child objects, materials, scripts and property values. When you place instances in multiple scenes, they share a controlled source. If you later improve the base object, you can update instances consistently.
Useful reusable systems include:
- a pickup item with mesh, collider, rotation animation, sound and score script;
- an enemy spawn point with visual marker, spawn radius and enemy type setting;
- a door with animation, lock requirement, sound effects and interaction prompt;
- a UI message widget with font, colours and animation;
- a checkpoint trigger with respawn location and save-state call.
Connecting code and assets
Scripts usually need references to assets or components. For example, a pickup script may reference a particle effect prefab, an audio clip and a score manager. A door script may reference an animator, audio source, lock icon, collider and required key item.
Connect references in a controlled way:
- Identify dependencies. List what the script needs to function.
- Decide how references are assigned. Options include inspector assignment, searching by tag, dependency injection, data assets, or automatic lookup on the same object.
- Prefer explicit references for prototypes. Dragging references into fields is clear and easy to inspect, although it must be checked carefully.
- Validate missing references. Code should fail clearly or disable optional features rather than producing silent errors.
- Test prefab instances. Confirm the reusable object works when duplicated and when placed in a fresh scene.
Avoid fragile approaches such as finding objects only by exact name. Names change during production. Tags, interfaces, exposed references or central managers are usually more reliable.
Capabilities and constraints of game engines
Engines provide major capabilities: rendering, physics, audio, animation, scripting, input, UI, scene management, profiling, package management and build tools. They also impose constraints. You work within the engine’s component model, supported languages, asset pipeline, physics behaviour, lighting system and target platform support.
For example, real-time global illumination, high-quality shadows and complex physics may look impressive in the editor but reduce frame rate on student laptops or mobile hardware. Visual scripting may be accessible for designers but can become difficult to maintain if graphs are large and undocumented. Built-in character controllers can accelerate prototyping but may not support every custom movement mechanic.
The professional decision is not “use every feature”. It is “use the simplest engine feature that meets the requirement and can be maintained by the team”.
Version control and production discipline
When combining assets and code, production risk increases because one change can affect many objects. Use version control where available. Commit meaningful units of work, such as “add reusable locked door prefab” rather than “changes”. Do not commit generated build files, caches or local settings unless the project policy requires them.
If you are working in a shared online cohort, communicate before editing the same scene or prefab as another learner. Binary asset files can be difficult to merge. Some teams reduce conflict by assigning scene ownership, using additive scenes, or placing gameplay prefabs in separate files.
Workplace example
A small Adelaide studio builds a 3-D environmental puzzle prototype. The designer wants five locked doors using different key colours. Instead of creating five separate scripts, the developer builds one `LockedDoor` prefab with editable fields for required key ID, door material, prompt text and audio clip. The team can place multiple instances and tune each one without new code.
The developer then tests the prefab in an empty scene, duplicates it, changes key IDs, and checks that each instance opens only with the correct key. This confirms that assets and scripts combine reliably and the solution supports production rather than just a single demonstration.
Contingencies
If combined assets stop working after a move or rename, check broken references and source control history. If performance drops after adding assets, profile the scene and inspect texture sizes, draw calls, lights, physics objects and script update costs. If a purchased asset conflicts with the project’s render pipeline or engine version, check vendor documentation before modifying project-wide settings.