Week 10 — Elements 4–5
4.3 Test and run game prototype as a presentation and confirm sequences meet creative, production and technical requirements
4.3 Preparing to run the prototype as a presentation
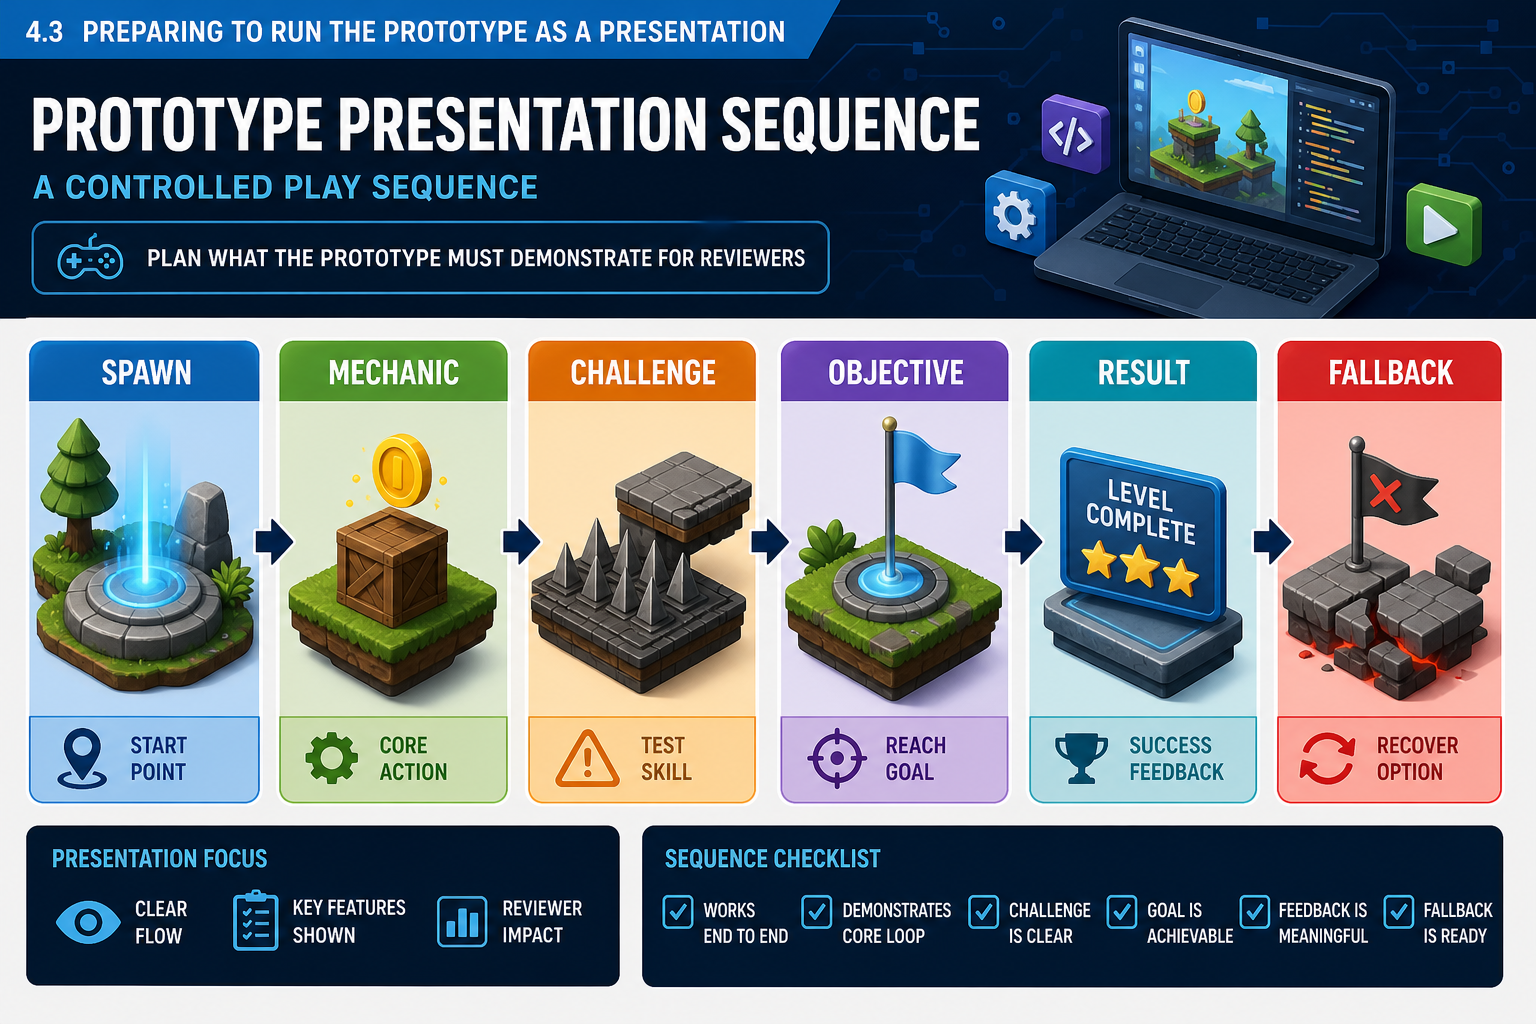
What a prototype presentation must prove
Testing and running a prototype as a presentation means showing the intended gameplay sequence in a controlled, reviewable form. The goal is not to pretend the game is finished. The goal is to demonstrate that the current prototype meets agreed creative, production and technical requirements well enough for decision-making.
A presentation may be delivered to a client, assessor, producer, creative director, publisher, playtest group or internal team. In an online course, it may involve a screen recording, live screen share, packaged build or submitted playable file. Whatever the format, the sequence must be prepared and checked.
Define the presentation sequence
A sequence is the ordered flow of events you expect the reviewer to see. For example:
- Main menu or start screen loads.
- Player spawns in the test level.
- Player learns movement and camera.
- Player collects first item.
- Objective UI updates.
- Player avoids hazard.
- Player unlocks exit door.
- Completion screen appears.
Write this sequence before the presentation. It becomes the basis for testing. It also helps you identify critical path elements: if the collectible counter fails, the exit door cannot be shown; if the player spawn is wrong, the whole demonstration starts badly.
Preparing the prototype
Use this preparation procedure:
- Select the correct scene or level. Remove old test scenes from the presentation path unless they are needed.
- Set a reliable start state. Confirm spawn position, camera, player health, inventory, objectives and UI.
- Check required assets are included. Missing materials, audio, fonts or shaders can appear only in a build if references are wrong.
- Remove disruptive debug content. Keep useful diagnostic overlays only if the review requires them.
- Confirm input mappings. Test the actual keyboard, mouse, controller or other hardware to be used.
- Check quality settings and resolution. Use settings appropriate for the target hardware and presentation context.
- Run from start to finish. Do not test only isolated sections.
- Package or record correctly. If submitting online, follow LMS file size, format and naming requirements.
Presentation-ready is not the same as finished
A prototype may contain placeholder art, incomplete menus or limited content and still be presentation-ready if those limitations are known and do not block the sequence. However, avoid presenting random editor clutter, broken console errors, missing references or untested controls. A rough but stable prototype is more useful than an ambitious but unreliable one.
Workplace example
A Gold Coast studio prepares a vertical slice prototype for a publisher meeting. The creative goal is to show traversal and environmental puzzle solving. The production goal is to secure feedback before further funding. The technical goal is a Windows laptop build with controller support.
The team creates a locked presentation path: spawn, tutorial prompt, climb section, pressure plate puzzle, door open, vista reveal. They test the sequence on the actual laptop used in the meeting, not only on the development workstation. They also prepare a short gameplay video as backup in case hardware or screen-sharing fails.
Risk controls and contingencies
Presentation risk is real production risk. Controls include:
- keeping a known-good build archived;
- rehearsing the sequence;
- having a backup input device;
- preparing a video capture if live play fails;
- documenting known issues before the review;
- avoiding last-minute untested changes;
- checking audio levels and screen capture settings for online delivery.
For WHS, do not create rushed all-night build sessions as a normal practice. Fatigue increases errors and can create unsafe work habits. Good scheduling and earlier testing are safer and more professional.
4.3 Testing the prototype in editor and build
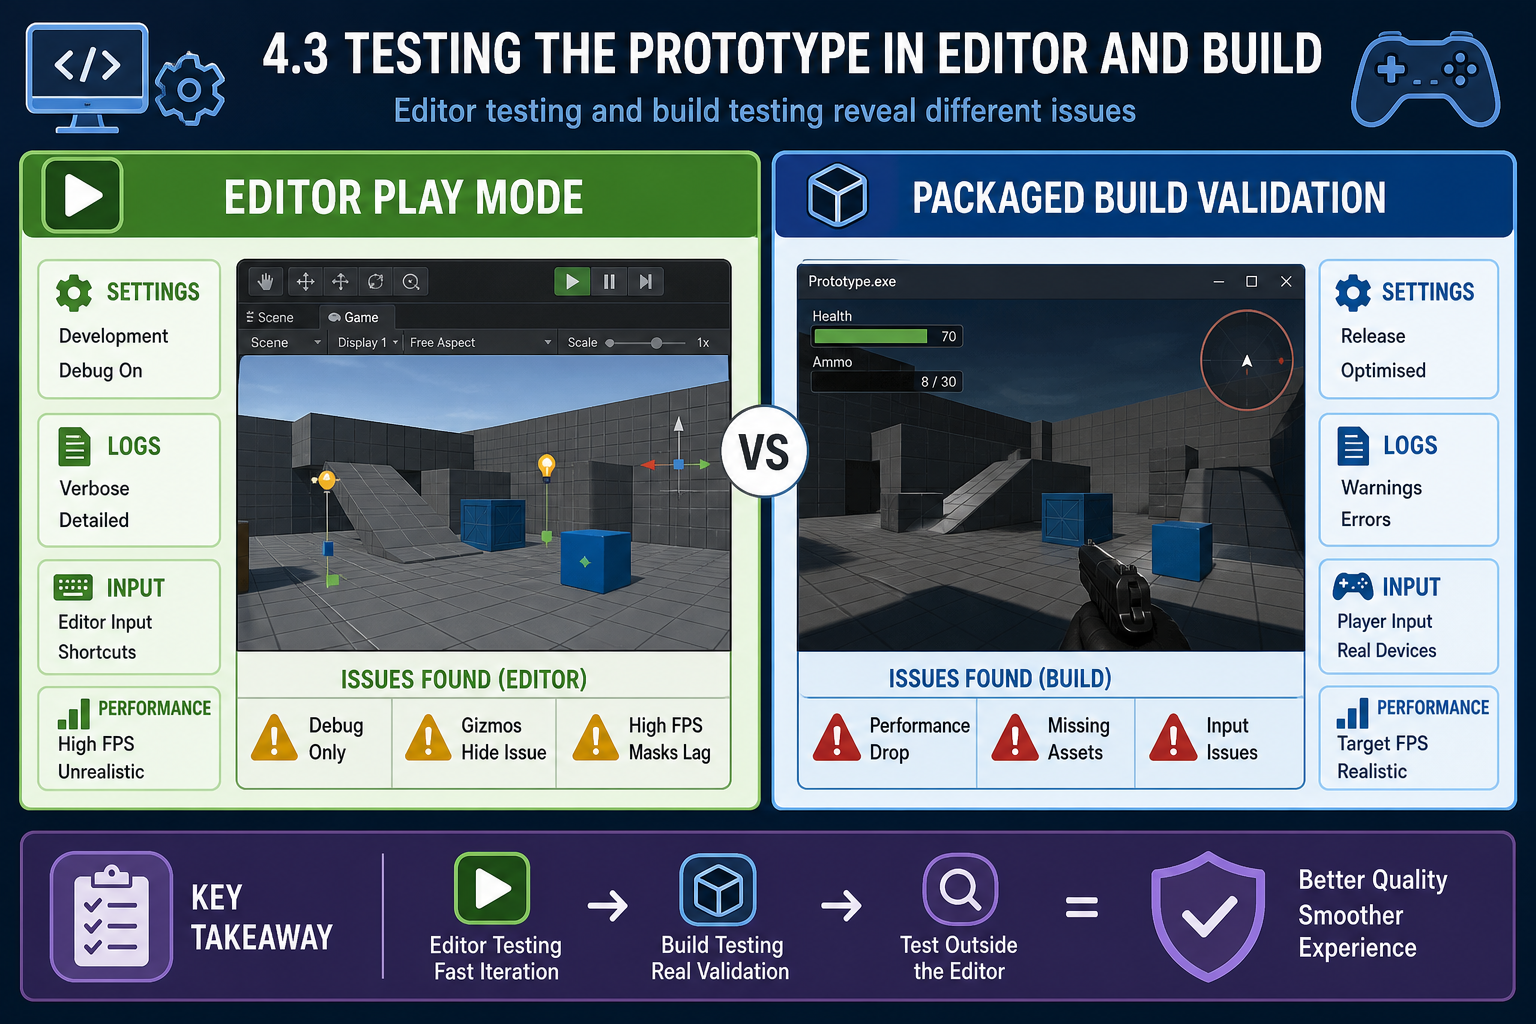
Editor testing versus build testing
Game engines support quick in-editor testing, such as Play mode in Unity or Play In Editor in Unreal. This is essential for iteration. You can adjust values, inspect objects, read console output and quickly retry.
However, editor testing is not enough for presentation validation. The editor includes tools, debug systems and resources that may hide build problems. A packaged build may use different quality settings, file paths, input handling, shader compilation, scene inclusion, permissions or performance characteristics.
For performance criterion 4.3, you must test and run the prototype as a presentation. That means checking both the development environment and the presentation form.
A practical testing pass
Use this sequence:
- Clear known compile errors. A prototype with script compilation errors is not ready for presentation.
- Run in editor from the intended start point. Check core sequence and console warnings.
- Fix blocking defects. Prioritise defects that stop the sequence or misrepresent the creative goal.
- Create a packaged build or approved presentation output. Include required scenes and assets.
- Run the packaged build on target or comparable hardware. Do not assume your development machine represents the review environment.
- Complete the full sequence without developer shortcuts. Use normal player input, not editor object dragging or inspector changes.
- Record results. Note pass, fail, known issues and build version.
- Repeat after changes. Any fix can introduce regression.
What to watch for
During a run, check:
- startup time and whether the correct scene loads;
- screen resolution, aspect ratio and UI layout;
- mouse capture, controller recognition and input prompts;
- missing assets, pink materials, silent audio or wrong animations;
- collisions, triggers and physics sequence reliability;
- save, reset, checkpoint or restart behaviour;
- console errors, warnings or log spam;
- frame drops during the planned presentation moments;
- end state, completion screen or transition.
In Unity, simple diagnostic messages can be sent to the Console during Play mode, and many engines provide equivalent logging. Use logs to confirm event order, but remove excessive debug output before formal presentation unless it is needed for technical review.
Hardware and software product features
The hardware and software products used for gameplay affect test outcomes. A keyboard-and-mouse PC game may depend on cursor lock, key rollover, mouse sensitivity and display resolution. A controller game depends on button mapping, analogue stick dead zones, vibration support and platform driver recognition. VR or AR projects add headset tracking, motion controllers, comfort and safety considerations.
Software features also matter: operating system, graphics API, engine version, render pipeline, installed redistributables, browser support for WebGL/WebGPU builds, and audio device selection. Always test the presentation setup, not just the project file.
Workplace example
A Newcastle team prepares an online assessment prototype for a 3-D puzzle game. In editor mode, the prototype works. In the packaged build, the second level does not load because it was not included in build settings. The UI also scales poorly on a laptop screen.
The team updates the build scene list, tests UI anchors at the target resolution, creates Build 0.4, and records the fix in the development log. This confirms that the sequence meets technical requirements in the actual presentation form.
Common mistakes
Do not make a build for the first time on submission day. Build errors, missing scenes and platform settings are normal development issues. Do not test with cheats or editor-only shortcuts unless the presentation explicitly includes a debug demonstration. Do not ignore warnings that appear repeatedly; log spam can hide important errors and reduce performance.
If the build fails close to presentation, use a planned fallback. This may be an archived stable build, a recorded video, or a reduced sequence that still demonstrates the core mechanic. Record what changed and what remains unresolved.
4.3 Confirming technical requirements and final readiness
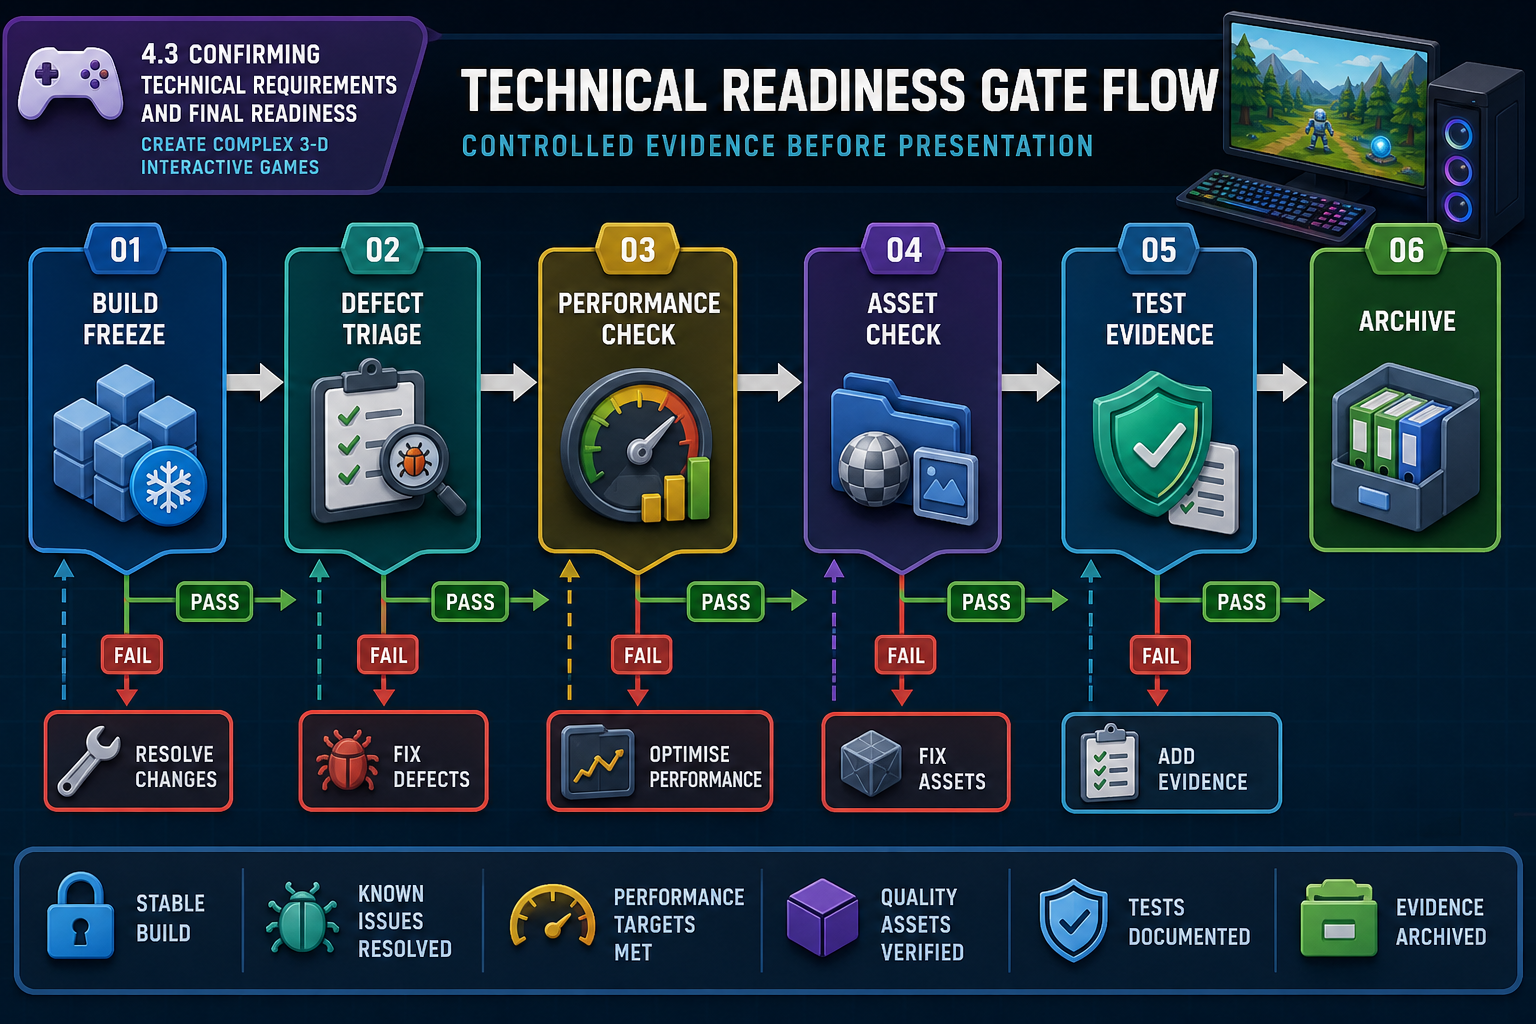
Technical readiness for presentation
Technical confirmation asks whether the prototype runs reliably enough in the required presentation environment. It does not require commercial polish, but it does require controlled evidence that the sequence works.
Check technical requirements such as:
- engine version and project dependencies;
- target operating system or platform;
- minimum expected hardware for the cohort or client;
- required input devices;
- resolution, aspect ratio and UI scaling;
- audio output and volume balance;
- asset formats and included files;
- performance during key moments;
- build settings, scene list and quality settings;
- accessibility or usability requirements stated in the brief.
If the brief includes accessibility expectations, treat them as real requirements. Examples may include readable text size, remappable controls, captions for essential audio, colour-independent feedback or reduced motion options. Do not invent requirements, but do not ignore those supplied by the client, assessor or studio.
Defect triage before presentation
You will rarely have time to fix every issue. Use triage:
- Blocker: prevents the presentation sequence from running. Fix or use fallback.
- Critical: seriously misrepresents gameplay or causes frequent failure. Fix if at all possible.
- Major: affects quality or clarity but has a workaround. Fix if time allows.
- Minor: cosmetic or low-impact. Record for later.
Priority depends on the presentation goal. A missing final texture may be minor in a mechanics review but major in an art direction review. A small input bug may be critical if the stakeholder will play live.
Build freeze and change control
Before the final presentation, set a build freeze point. After this time, only approved fixes should enter the presentation build. This reduces the risk of last-minute regressions.
A practical build freeze process:
- Create a release candidate build.
- Run the full sequence test.
- Record pass/fail results.
- Fix only approved blockers or critical defects.
- Rebuild and retest affected sequence areas.
- Label the final build clearly, such as `Prototype_Warehouse_v0.5_Presentation`.
- Archive the build, test notes and source commit or project backup.
This is a scaled-down version of industry release management and is appropriate even for student prototypes.
Evidence of testing
For assessment and workplace accountability, keep evidence. This may include:
- completed test checklist;
- issue tracker export or screenshots;
- build version notes;
- profiler screenshots;
- screen recording of the successful sequence;
- source control commit ID;
- peer review feedback;
- list of known limitations.
Evidence is useful if a stakeholder reports a later problem. It shows what was tested, on what version and under what conditions.
Australian workplace and legal context
For a presentation build, compliance still matters. Ensure you have the right to distribute any included third-party assets, even to a small review group. Check software licence terms for engine plugins and marketplace content. If the prototype collects player data during testing, privacy obligations may apply; in Australia, organisations covered by the Privacy Act 1988 must handle personal information appropriately. For most student prototypes, the safest approach is to avoid collecting personal data unless the assessment specifically requires it and approved processes are in place.
WHS also applies to presentation sessions. If testing VR or motion-heavy content, consider physical space, trip hazards, motion sickness and supervision. For standard desktop work, manage screen time, posture and fatigue.
Workplace example
A Launceston game team prepares a 3-D controller-based prototype for an investor demo. The final test finds a major issue: if the controller disconnects, the game cannot return to keyboard input. Because the investor will play with a controller, the team treats it as critical. They add a simple input reconnection prompt, retest the sequence, and freeze the build. A lower-priority texture seam is recorded but not fixed before the demo.
This shows professional prioritisation: the team protects the presentation sequence and technical requirement rather than chasing every visible imperfection.
Common mistakes
Do not submit an unversioned folder called “FinalFinal2”. Do not rely on cloud sync as your only backup minutes before submission. Do not change engine versions immediately before a presentation unless required; upgrades can alter packages, rendering, physics or script behaviour. Do not delete old stable builds until the new build has been tested.