Week 7 — Element 3
3.3 Create or acquire visual assets for a games project
3.3 Create visual assets in-house
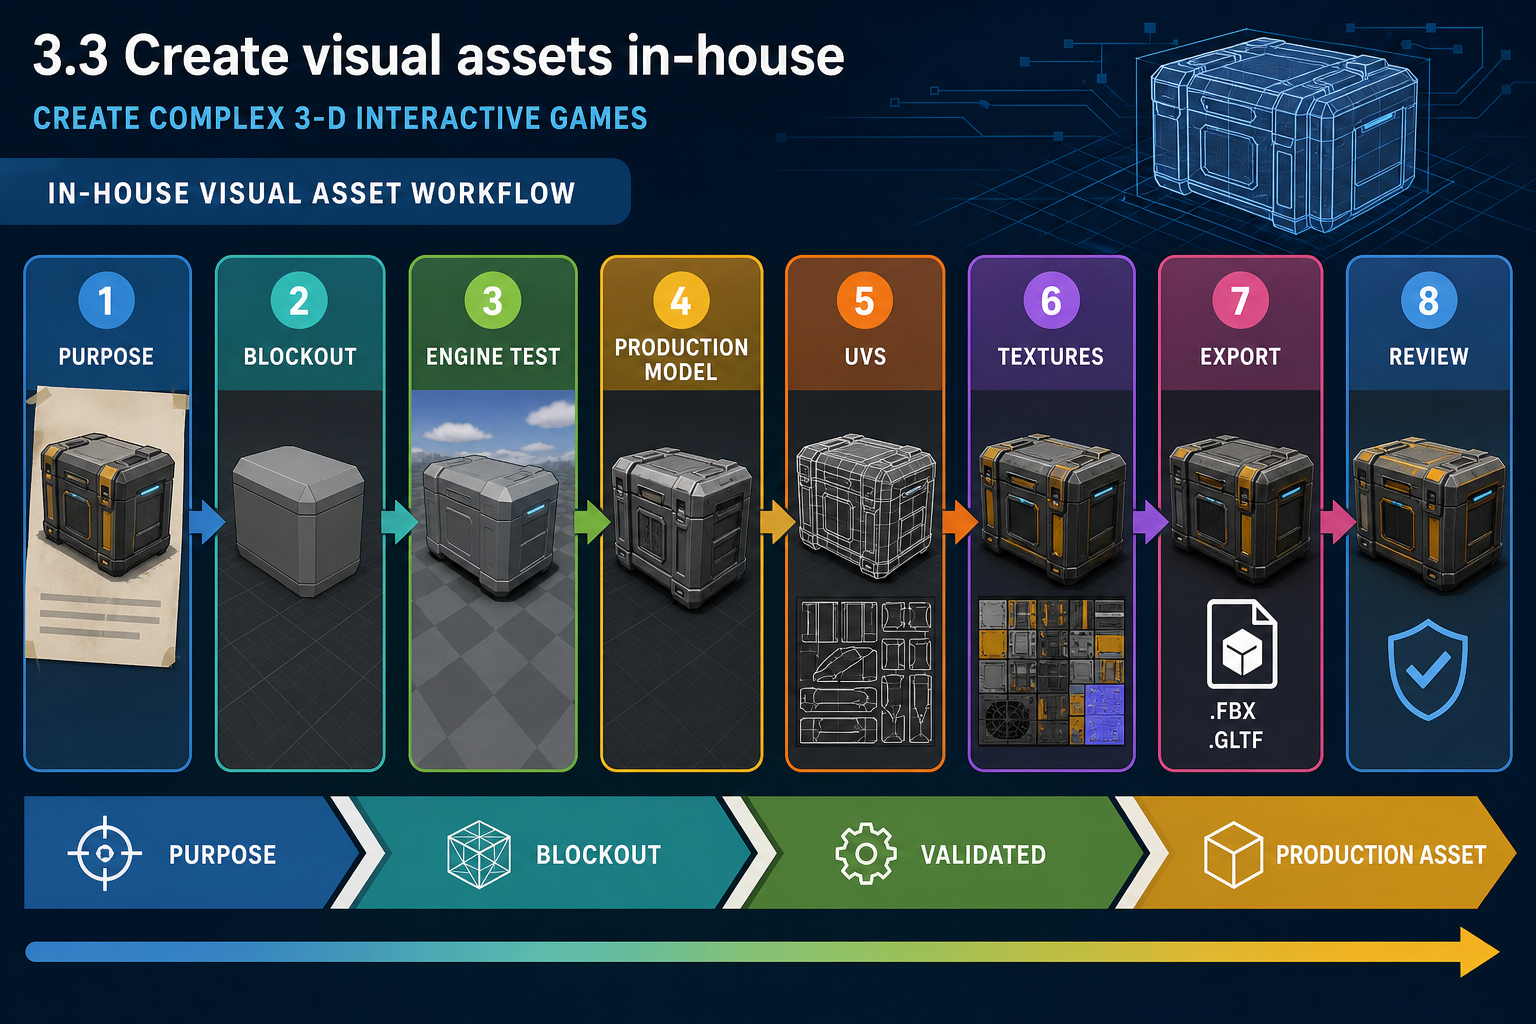
Creating assets from requirements
When you create visual assets for a game project, work from the asset brief and pipeline rather than from personal preference alone. Visual assets include 3-D models, materials, textures, sprites, UI elements, VFX source elements, icons and scene dressing. In a 3-D interactive game, the most common created assets are environment props, modular kits, characters, weapons, vehicles and interactive objects.
A practical creation workflow is:
- Confirm the asset’s purpose, style, scale and engine target.
- Make a blockout or proxy asset first.
- Test the blockout in engine for scale, gameplay space and camera readability.
- Create the production model or texture work.
- Prepare UVs, materials and export settings.
- Import to engine and check against the asset acceptance criteria.
- Commit source and exported files to the shared environment.
The blockout stage is important. A grey box door, crate or enemy silhouette can reveal gameplay problems before time is spent on detail. For example, a cover object may look good as concept art but be too low for the player’s camera height or too wide for a corridor.
Technical creation considerations
For mesh assets, consider:
- silhouette readability from gameplay camera distance
- topology suitable for deformation if animated
- efficient use of polygons where they affect shape
- correct pivot placement for rotation, snapping or placement
- clean transforms and scale applied before export
- UV layout appropriate for textures and lightmaps if used
- material slot count kept manageable
- collision approach planned.
For textures and materials, use a workflow that suits the engine’s rendering model. Many contemporary engines use physically based rendering principles, commonly involving maps such as base colour, normal, roughness, metallic and ambient occlusion. The exact setup differs by engine and project shader. Do not create texture channels without knowing how they will be used.
Example
A Perth student team is creating a stylised desert platformer in Unity. The environment artist builds a modular rock kit. Before sculpting details, they create simple blockout rocks and test jump distances, camera framing and collision. After approval, they produce final meshes with shared trim textures and simple colliders. This saves time because the final art supports the already-tested level design.
WHS and production care
Asset creation can involve long screen sessions and repetitive input using mouse, pen tablet or keyboard. Apply safe work habits: adjust seating, take breaks, manage glare and avoid deadline patterns that encourage excessive hours. File safety also matters. Save incrementally, use version control and avoid keeping the only copy of source art on a local drive.
Common mistakes
- Creating final detail before checking gameplay scale.
- Modelling hidden detail that the camera never shows.
- Applying destructive edits without retaining source versions.
- Exporting from a different preset each time.
- Forgetting that visual assets must also support collision, animation, scripting and performance.
Creating assets in-house gives maximum control, but only if the work follows the shared pipeline.
3.3 Acquire assets legally and strategically
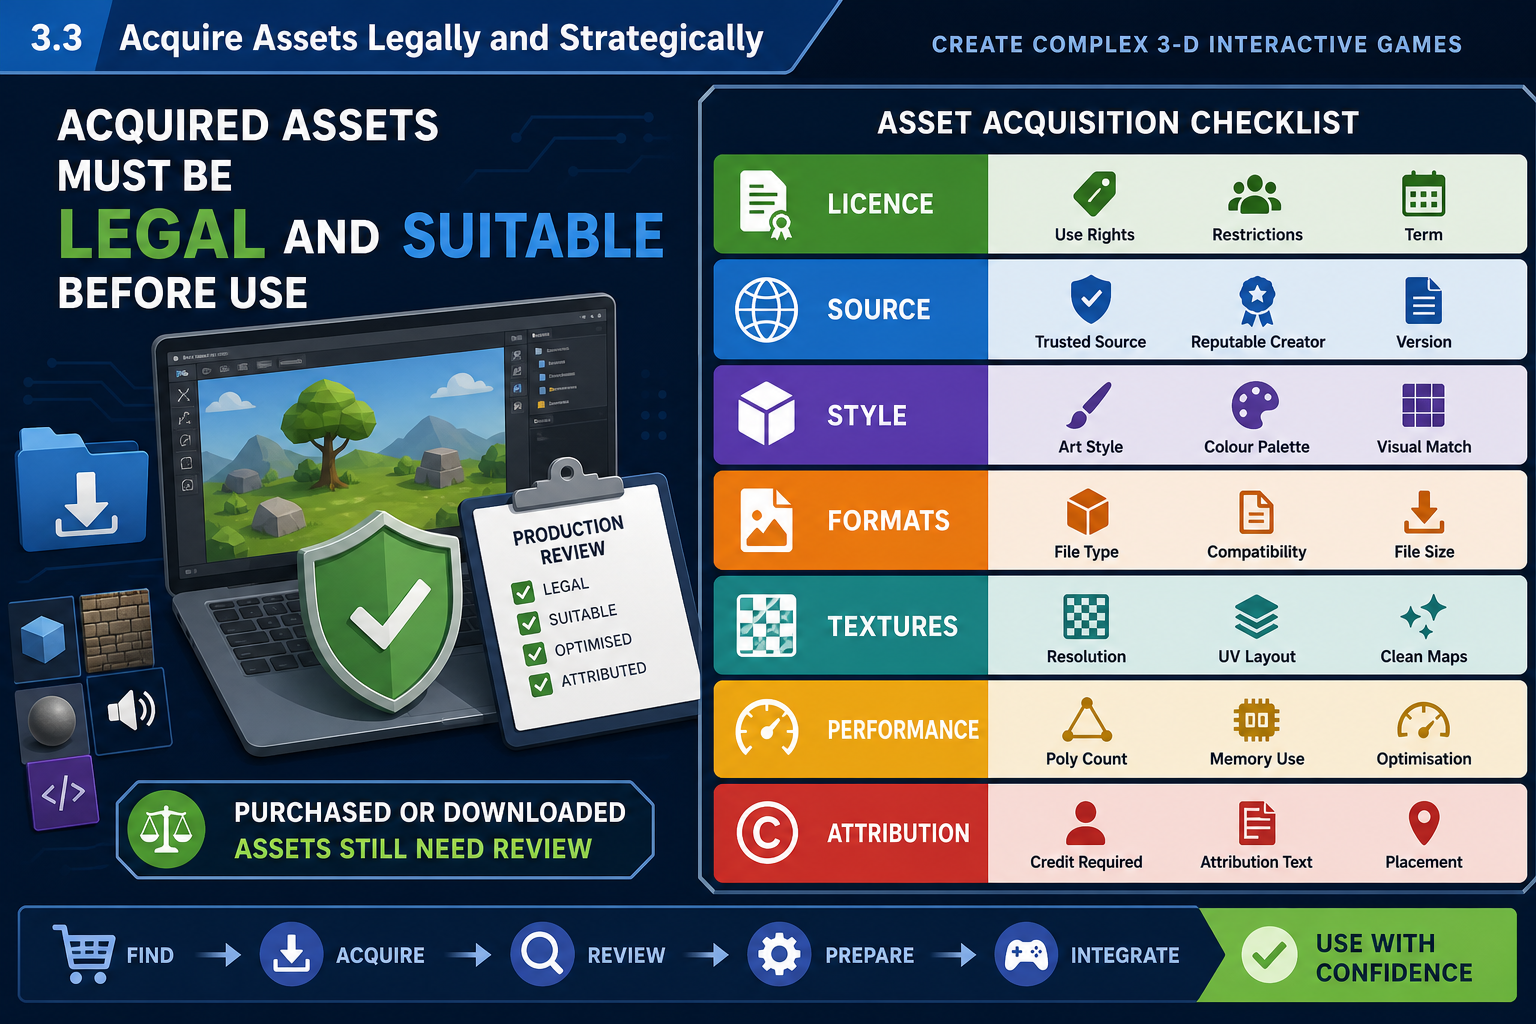
Acquisition is not a shortcut unless managed well
Game teams often acquire assets from marketplaces, contractors, open-source libraries, photogrammetry providers or internal studio libraries. This can save time, but acquired assets still require review, licensing control and integration work. A purchased model that does not match the game’s style, scale, licence or performance target can become more expensive than creating it yourself.
Before acquiring an asset, compare it with the asset brief:
- Does it match the visual style and quality bar?
- Does it include the required formats and source files?
- Is the polygon density suitable or can it be optimised?
- Are textures provided at usable resolutions and in the right map types?
- Does it include rigging, animation, LODs or collision if required?
- Is it compatible with the chosen engine and render pipeline?
- Are there restrictions on commercial use, modification, redistribution or attribution?
Legal requirements in Australia
The Copyright Act 1968 protects artistic works, photographs, models, textures, audio and other creative material. You cannot assume that an image found online, a model from a forum or a scanned object is free to use. Asset-store terms are also contracts: they may limit redistribution, use in templates, use in NFTs, sharing outside your team or use in client projects.
Keep licence evidence in the project documentation. Record:
- asset name and source URL or supplier
- purchase receipt or licence file
- permitted uses
- attribution requirements
- modification rights
- any restrictions on redistribution or commercial release
- date acquired and team member responsible.
Respect moral rights, including attribution and integrity of authorship, where applicable. If an asset includes cultural content, especially First Nations cultural expressions, do not rely only on a generic marketplace licence. Seek appropriate permissions and follow respectful consultation processes.
Contractor and outsourcing considerations
If you commission an asset from a freelancer or external studio, confirm ownership and usage rights in writing. In many projects, paying for work does not automatically mean you receive every right you need. The agreement should identify deliverables, source files, revision rounds, confidentiality, licence or assignment of rights, and whether the artist may reuse the work.
Example
A Newcastle indie team buys a medieval village pack for a prototype. Before using it in a public demo, the producer checks the marketplace licence, stores the receipt, confirms commercial use is allowed, and records that redistribution of raw source files outside the team is not allowed. The technical artist then tests the meshes in the chosen engine and identifies that some materials need conversion to the project shader.
Common mistakes
- Downloading “free” assets without reading the licence.
- Sharing marketplace assets publicly in a repository.
- Assuming purchased assets match the game’s performance target.
- Forgetting attribution requirements.
- Acquiring assets with a style that clashes with the art direction.
Acquisition is a production decision. It must satisfy legal, creative, technical and scheduling requirements.
3.3 Prepare acquired assets for the project pipeline
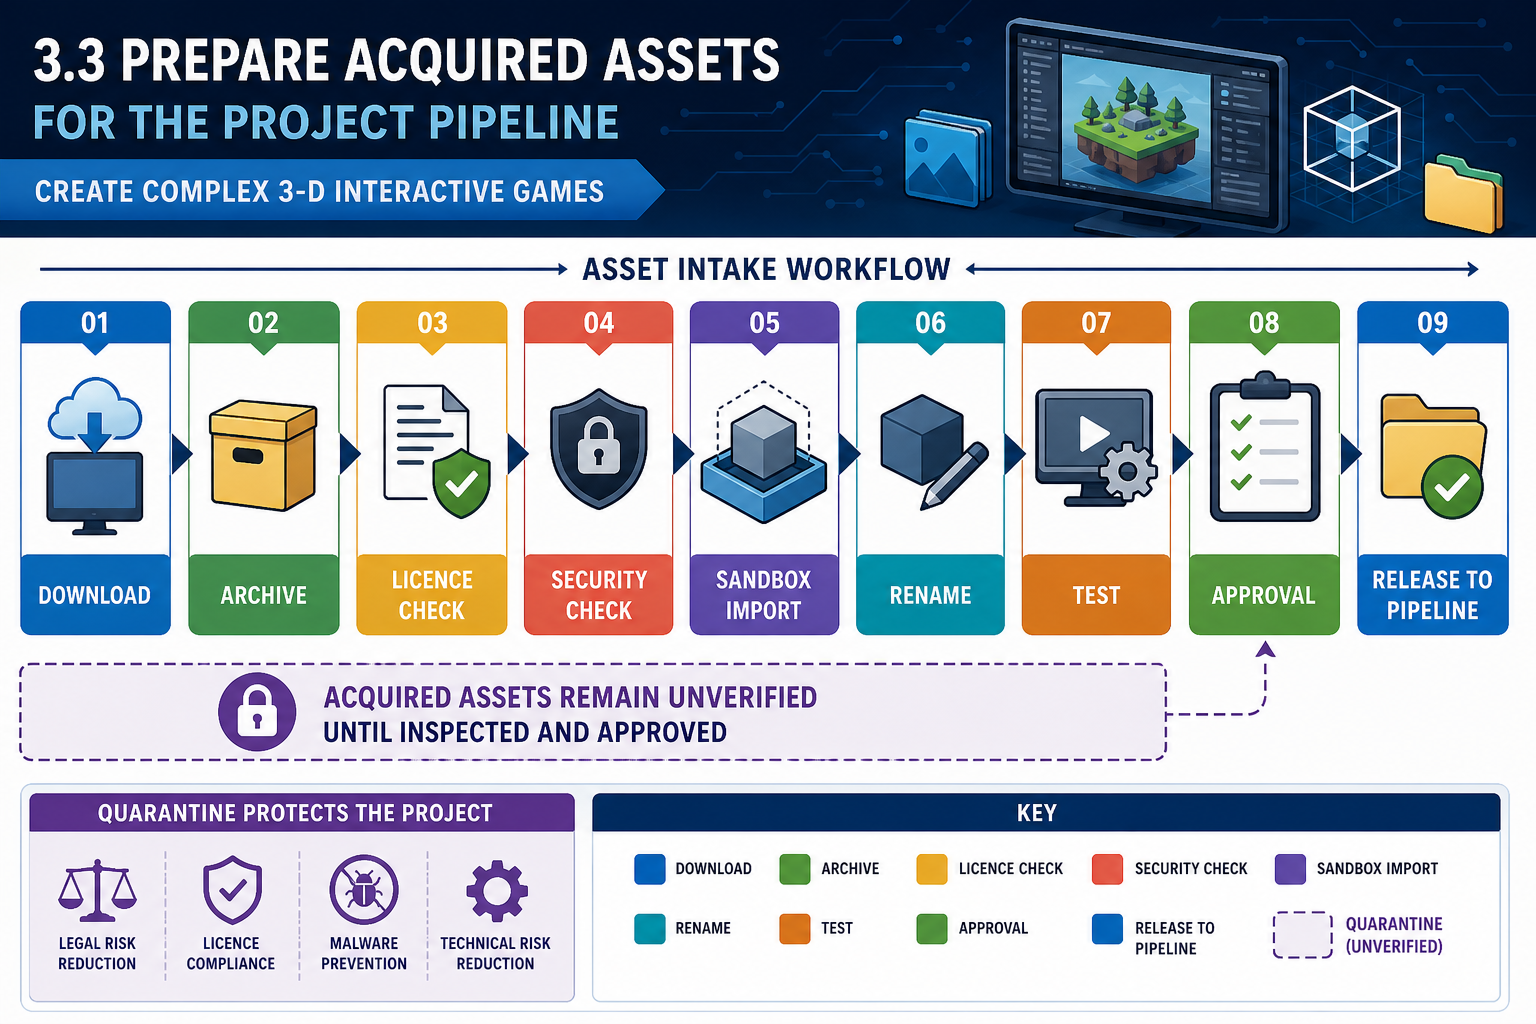
Treat acquired assets as unverified until checked
Do not drop acquired assets directly into the production content folder and start building with them. Treat them as incoming material that must be inspected, organised and approved. This protects the project from broken references, licence gaps, malware risks, style mismatch and technical surprises.
A safe intake process is:
- Download from the official source or supplier channel.
- Store the original package in an `External/Originals` or controlled archive location.
- Check licence files and receipts.
- Run normal security precautions appropriate to your organisation’s systems.
- Inspect the package contents before importing.
- Identify source files, exported files, textures, materials, demo scenes and documentation.
- Rename and relocate copies according to the project naming convention.
- Import into a test project or sandbox scene first.
- Record findings in the asset register.
Preserving the original package is important. If conversion fails or a later licence question arises, the team can return to the unmodified source.
Technical inspection
For acquired meshes, check scale, pivot, topology, normals, UVs, material slots, texture links and animation data. For texture sets, check naming and channel packing. Some packs use one workflow, such as metallic-roughness, while your project shader may require different channel inputs. Some assets include very high-resolution textures intended for cinematic rendering rather than real-time gameplay.
For engine-specific packs, check compatibility with the exact engine version and render pipeline. A Unity asset made for one render pipeline may require material conversion in another. An Unreal asset may rely on plugins or project settings not present in your game. Read the documentation and identify dependencies before adding the asset to the main project.
Scenario
An online Diploma learner downloads a free sci-fi door model for an Unreal prototype. The asset includes an FBX, three texture maps and a preview render. In the engine, it imports at the wrong scale and has no collision. The learner stores the original, creates a renamed project copy, adjusts export/import settings, creates simple collision, and records that the licence allows educational use but requires attribution. The asset can now be used in the student build with fewer risks.
Scheduling impact
Acquired assets still need time for intake, conversion, style adjustment and testing. Add those tasks to the schedule. If a critical asset is acquired late and fails import, the project may lose more time than expected. For high-risk assets, acquire and test early during prototype or vertical slice.
Common mistakes
- Importing a whole marketplace pack when only one asset is needed.
- Bringing demo scenes, scripts and settings into the main project without review.
- Renaming files after import in a way that breaks references.
- Modifying the only copy of a purchased asset.
- Ignoring plugin dependencies.
The aim is to convert external material into controlled project assets that your team can legally share and technically maintain.
3.3 Produce asset packages for integration
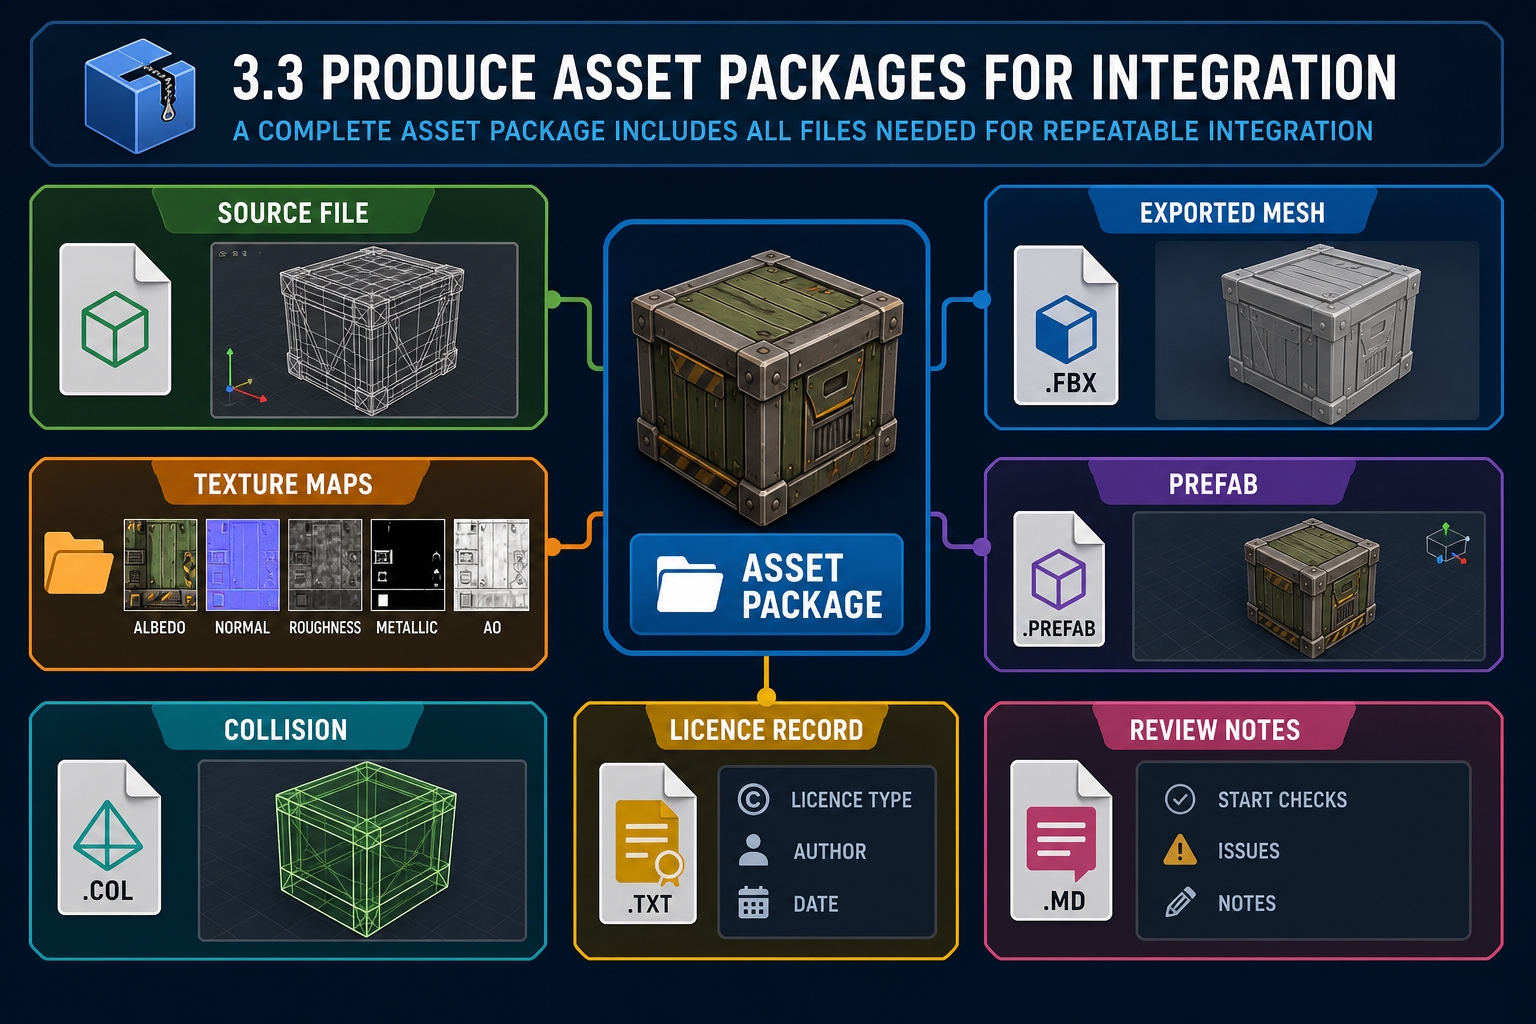
What a complete asset package contains
Creating or acquiring an asset is not complete until the team can integrate it reliably. A complete visual asset package usually includes more than one file. Depending on the asset type, it may contain:
- editable source files
- exported mesh files
- texture source files and exported texture maps
- material or shader setup notes
- rig, skeleton or animation files
- LOD meshes or settings
- collision meshes or collision instructions
- engine prefab, Blueprint or scene setup
- test scene or screenshot evidence
- licence and attribution records for acquired assets
- review notes and known limitations.
For small assets, this can be lightweight. For critical characters, vehicles or modular kits, it must be detailed enough for another team member to rebuild or troubleshoot the asset if needed.
Integration handoff
When handing off assets, use the shared environment correctly:
- Place source files in the agreed source location.
- Place exported files in the agreed export location.
- Import or update engine assets in the correct content folder.
- Ensure generated metadata required by the engine is committed.
- Update the asset register status.
- Add review notes, including tests performed.
- Commit with a meaningful message, such as “Add first-pass modular warehouse shelf with custom collision” rather than “update files”.
This helps programmers, level designers and testers understand what changed. In many game projects, a visual asset is only useful once it is connected to gameplay systems. A collectible mesh may need a prefab with a trigger, script component and icon. A weapon model may need sockets for muzzle flash and hand placement.
Basic programming connections
You may need to create simple engine objects that expose the asset to game logic. In Unreal, this might involve placing a mesh into a Blueprint Actor with components. In Unity, it might involve creating a prefab with a Mesh Renderer, Collider and script reference. This is where basic programming terminology matters: components, variables, events, references, tags and collision layers all affect whether a visual asset functions in gameplay.
Example
A Canberra simulation team creates a first-aid kit asset. The artist supplies the model and textures. The technical designer creates a Unity prefab with a collider, pickup script reference, icon, audio hook and tag used by the inventory system. The package is not just “a model”; it is an integrated gameplay asset ready for testing.
Quality checks before handoff
Before marking the asset ready, check:
- it opens correctly on another machine after sync
- no local-only paths are used
- materials and textures are not missing
- licences are recorded
- the asset appears in the expected folder
- naming matches convention
- test scene or placement confirms scale and collision.
Common mistakes
- Sending files through chat instead of committing them.
- Forgetting engine metadata files.
- Providing a mesh without textures or material notes.
- Leaving broken references that only work on the creator’s computer.
- Marking assets complete before another person has tested them.
Good asset packages support repeatability. Another team member should be able to sync, open the project and use the asset without private knowledge.