Week 9 — Element 4
4.2 Create and check game-play elements according to creative and technical requirements
4.2 Defining gameplay elements from requirements
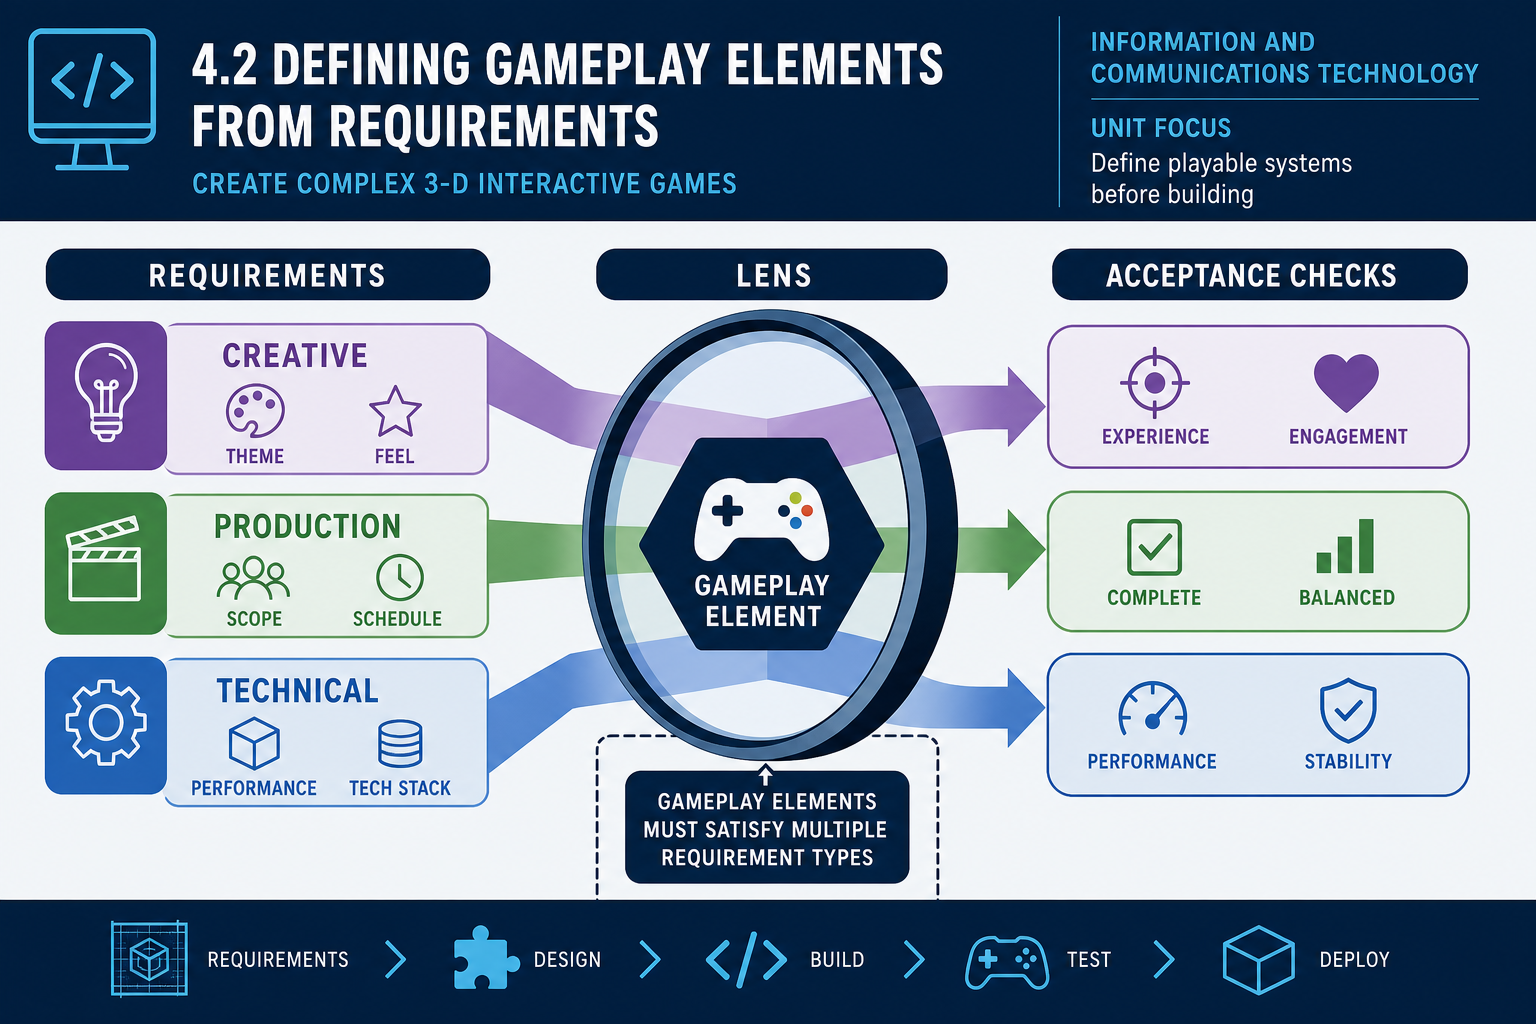
What counts as a gameplay element
A gameplay element is any interactive system that contributes to the player experience. It may be small, such as a pickup item, or broad, such as a combat loop. In a 3-D prototype, common gameplay elements include player movement, camera control, interaction prompts, hazards, enemies, doors, puzzles, scoring, health, checkpoints, inventory, timers, objectives, UI feedback and level transitions.
Creating a gameplay element means more than placing an object in the scene. The element must be playable, understandable and testable. It should support the game’s creative goals and satisfy technical limitations.
Creative, production and technical requirements
You must check gameplay against three overlapping requirement types:
- Creative requirements describe the intended experience, mood, rules, challenge and player fantasy. Example: “The player should feel vulnerable while searching a dark research facility.”
- Production requirements describe scope, schedule, team capacity, asset availability and milestone expectations. Example: “Prototype must be ready for a Friday review using existing greybox art.”
- Technical requirements describe engine version, target platform, input devices, frame rate goals, memory limits, file formats, accessibility expectations, build type or integration constraints. Example: “Runs on Windows laptops using keyboard and mouse, with controller support planned later.”
At Diploma level, you need to identify trade-offs. A complex enemy AI may support the creative vision, but if it threatens the milestone, a simpler patrol-and-chase prototype may be the correct production choice. A high-fidelity physics puzzle may be entertaining, but if it behaves unpredictably at low frame rates, it may fail the technical requirement.
Turning a brief into acceptance checks
Before building, create clear acceptance checks. These are practical statements that help decide whether the gameplay element is complete enough for the prototype.
For a collectible objective, acceptance checks might be:
- Player can see and identify the collectible in the level.
- Player can collect it using the required input.
- Collection updates the objective counter.
- Audio or visual feedback confirms collection.
- The collectible cannot be collected twice.
- The exit unlocks when the required count is reached.
- The system works after restarting the scene.
These checks are more useful than a vague instruction such as “make collectibles work”. They also help testing and presentation later.
Applied procedure
Use this step-by-step process:
- Extract the gameplay purpose. What player behaviour should the element encourage?
- Identify inputs and outputs. What does the player do, and what feedback or state change occurs?
- List dependencies. Assets, scripts, animations, UI, audio, physics, navigation, save data and other systems.
- Define acceptance checks. Make them observable in a play test.
- Build the simplest working version. Use placeholder art if necessary.
- Test in isolation. Confirm the element works before placing it in the full level.
- Integrate and retest. Check it still works with lighting, camera, UI, level geometry and other systems.
- Record issues and decisions. Use the team’s issue tracker, task board or development log.
Workplace example
A Perth studio is prototyping a 3-D rescue game for an emergency services training pitch. One gameplay element is “rescue a trapped NPC”. The creative requirement is urgency and empathy. The production requirement is a prototype review in two weeks. The technical requirement is a desktop build for standard office PCs.
The team decides not to implement full ragdoll carrying, voice recognition or complex medical simulation. Instead, they create an interaction zone, progress timer, animation, UI prompt and success state. This meets the prototype’s purpose: demonstrate the rescue loop and emotional pacing without spending the whole schedule on risky systems.
Common mistakes
A common mistake is building from a cool idea rather than the brief. Another is treating technical requirements as optional until the end. If the prototype must support controller input, design input actions early. If it must run on modest hardware, avoid building mechanics that depend on thousands of simulated objects.
Also avoid undocumented assumptions. If the brief does not specify whether the player can jump, save progress or fail an objective, ask the stakeholder or record an assumption before building. This protects the team from rework.
4.2 Building core gameplay elements in-engine
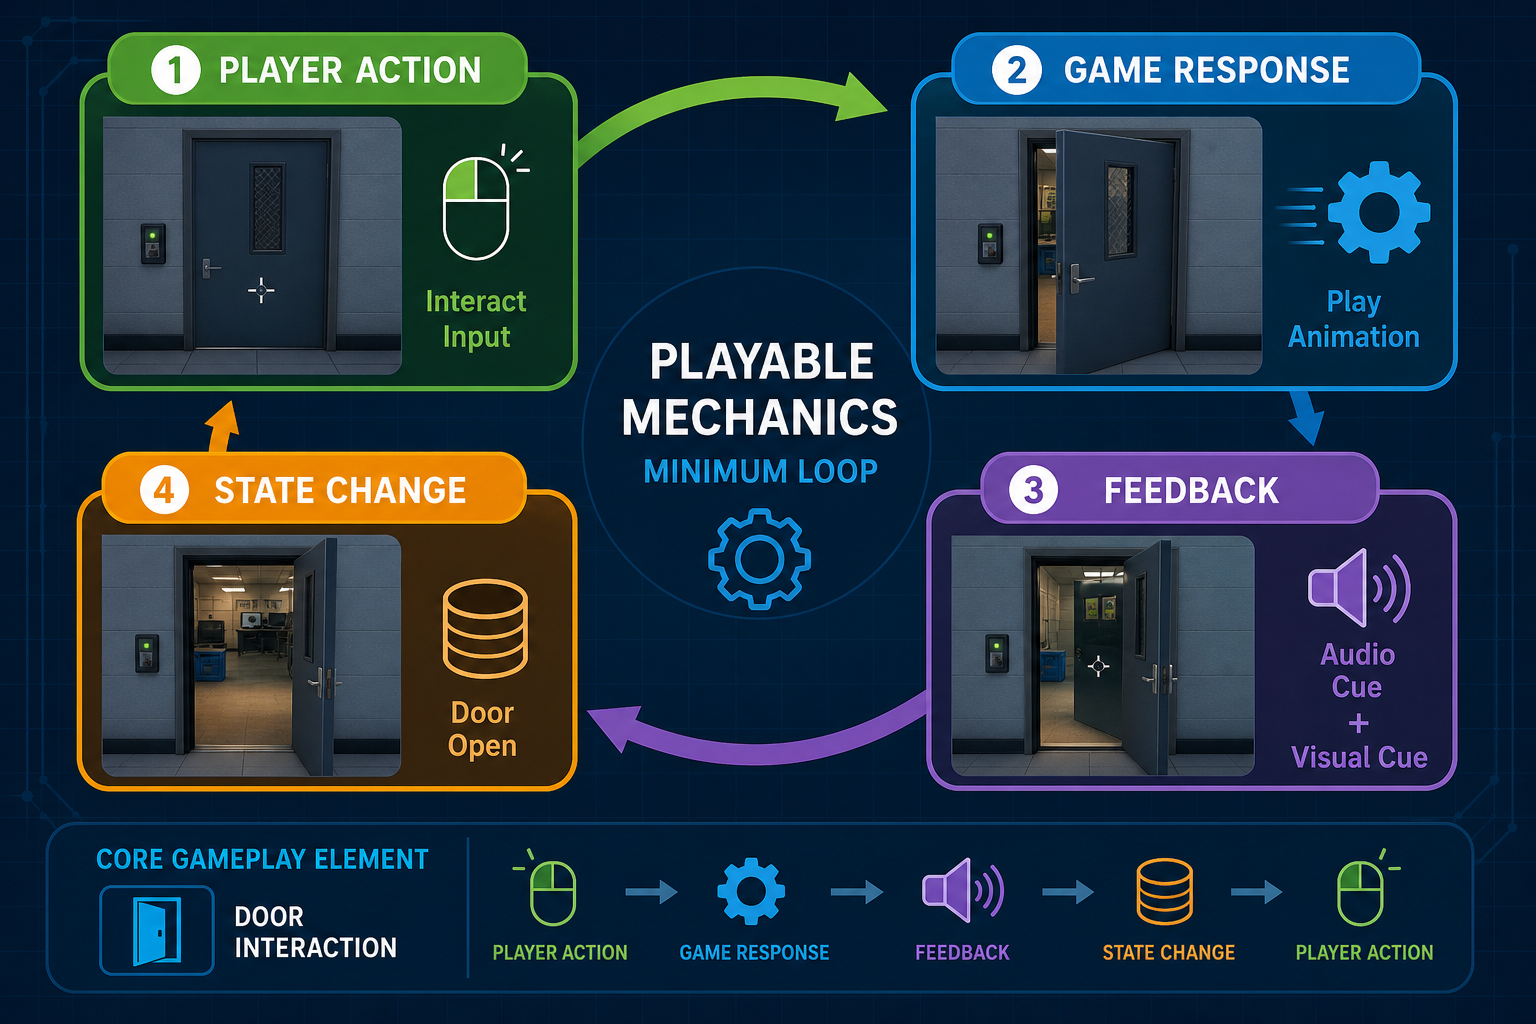
The minimum playable loop
Most gameplay elements should connect to a loop: the player acts, the game responds, the player receives feedback, and the state changes. If any part is missing, the element may feel broken even if the code technically runs.
For example, a door interaction loop might be:
- Player approaches door.
- Prompt appears: “Press E to open”.
- Player presses input.
- Door checks whether it is locked.
- Door opens or displays locked feedback.
- Sound, animation and objective state update.
Creating gameplay means designing this loop and implementing each part using engine tools.
Engine systems commonly used
A 3-D gameplay element may combine several engine systems:
- Input system for keyboard, mouse, controller, touchscreen or VR device mapping.
- Physics and collision for triggers, rigidbodies, character movement, projectiles and hazards.
- Animation for character states, doors, levers, pickups and feedback.
- Navigation or AI for enemy pathing, patrols or NPC movement.
- UI system for prompts, health, objective markers, score and menus.
- Audio system for confirmation, warning, ambience and spatial sound.
- Scene management for restarting, loading or transitioning.
- Scripting or visual scripting to connect rules and state.
Do not build everything from scratch if the engine provides a suitable system. However, understand the constraint. A built-in physics character controller may be fast to implement but may not suit a climbing mechanic or networked movement. A visual scripting graph may be ideal for a designer-owned puzzle but less suitable for complex shared systems without naming and documentation.
Step-by-step example: creating a hazard
Suppose the requirement is: “Create a toxic spill hazard that damages the player over time while they stand in it, with visible warning feedback.”
A practical build sequence is:
- Place the asset. Add or import a toxic spill mesh or decal. Use a placeholder if final art is unavailable.
- Add a trigger collider. Size it to match the dangerous area, not necessarily the visual mesh.
- Create a hazard script. Store damage per second, affected tags or layers, and optional audio/particle references.
- Detect entry and exit. Track whether the player is inside the trigger.
- Apply damage over time. Use a controlled timer or physics update, not uncontrolled repeated calls.
- Provide feedback. Add warning sound, screen edge effect, damage numbers, controller vibration if supported, or UI health reduction.
- Check failure state. Confirm what happens when health reaches zero.
- Tune values. Adjust damage rate and area size against the intended difficulty.
- Test edge cases. Jumping across, pausing, restarting, multiple hazards, player death inside hazard.
Checking in context
An isolated hazard may work, but context changes the result. Lighting may hide it. Camera angle may obscure the edge. Other audio may mask the warning sound. Level geometry may trap the player. The health UI may not be visible in the moment of damage.
After building the minimum version, place it in the intended level and check whether the player can perceive, understand and respond to the element. Gameplay quality depends on clarity, not just technical operation.
Australian workplace example
A Brisbane studio is developing a mining safety awareness prototype. A gameplay element requires the player to identify and avoid unsafe ground near machinery. The creative requirement is realistic caution rather than arcade punishment. The technical requirement is that it runs on training-room laptops with keyboard and mouse.
The team creates a hazard zone using a simple trigger collider, yellow-black material, ambient warning audio and a clear UI message. They avoid expensive simulated debris because it is not essential to the learning goal. They also check that the hazard depiction does not encourage unsafe real-world behaviour. For training or serious games, workplace context and duty of care influence design choices.
Common mistakes
Do not rely on only one type of feedback. A player may miss a visual effect, especially with dark lighting or colour vision differences. Combine UI, animation, audio or motion where appropriate. Do not make colliders significantly larger or smaller than the visible hazard unless the design communicates this clearly.
Do not leave prototype values unexplained. If damage is set to 999 for quick testing, restore a sensible value before presentation. Temporary hacks become production risk when they are not tracked.
4.2 Checking gameplay against technical constraints
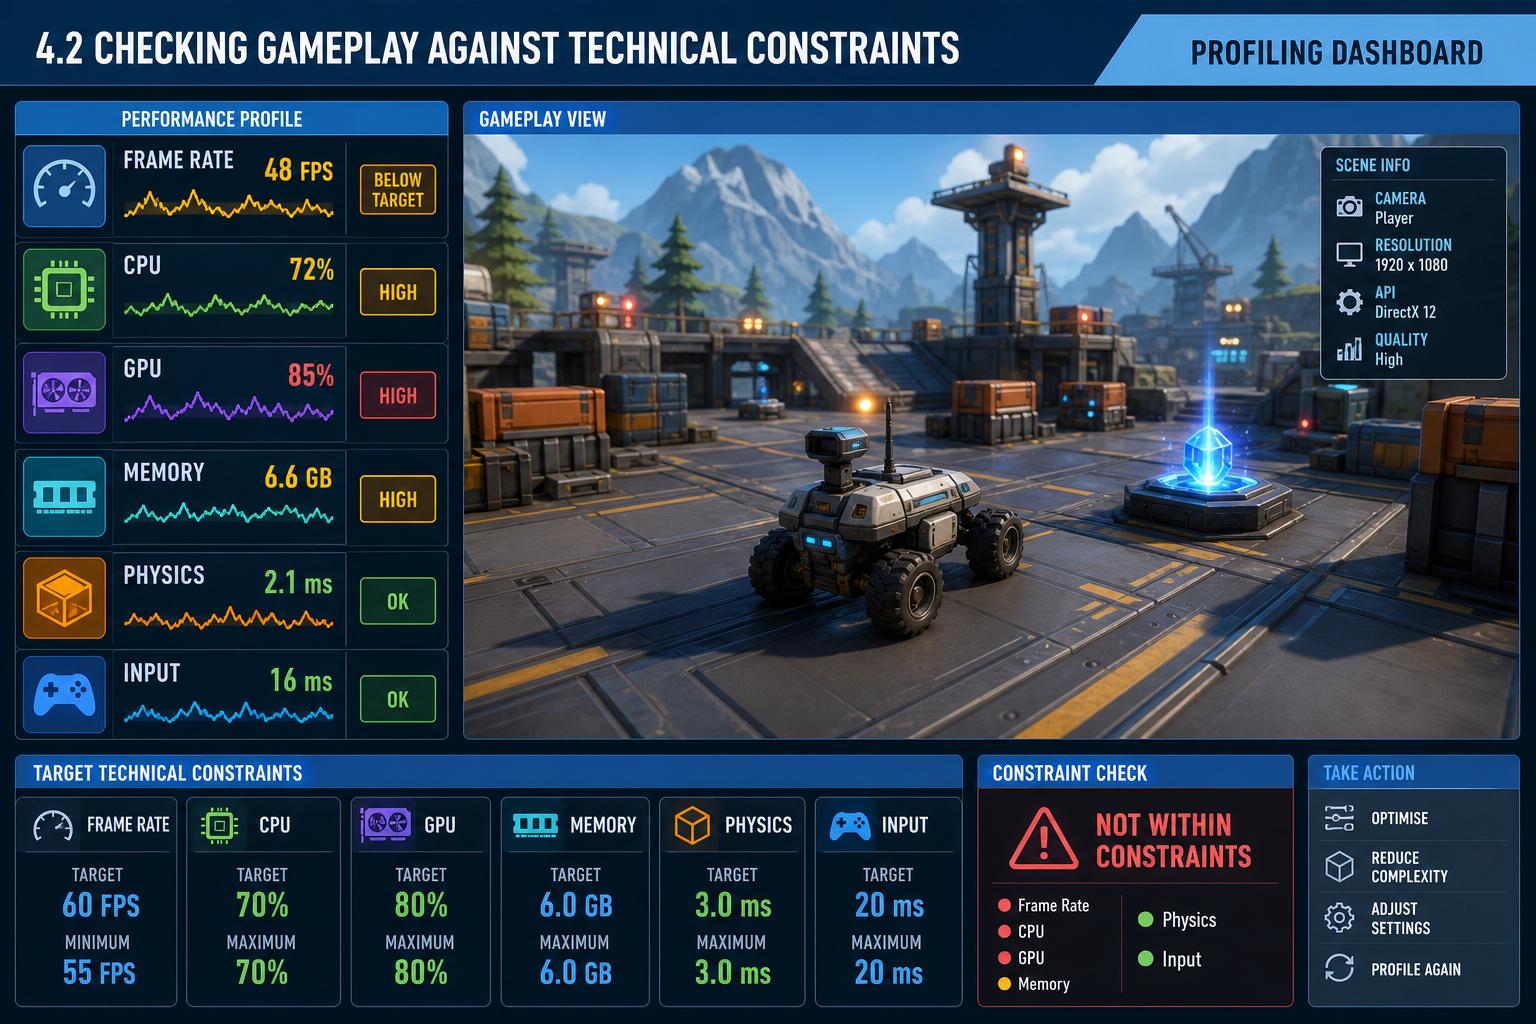
Why technical constraints shape gameplay
A gameplay element can meet the creative idea and still fail the project if it does not run reliably on the target hardware or software. Technical constraints include CPU and GPU capacity, memory, storage, input devices, display size, operating system, engine version, render pipeline, network availability and build platform.
For an online cohort, student-supplied hardware varies. A prototype that runs smoothly on a gaming desktop may struggle on an older laptop. In industry, the same issue appears when targeting mobile devices, classroom PCs, VR headsets, web builds or consoles. Platform limitations affect screen size, computing power, input methods and user expectations.
What to check
When creating gameplay elements, check:
- Frame rate and responsiveness. Does the element cause stutter, input lag or camera judder?
- Physics stability. Do collisions behave consistently, or do objects tunnel, jitter or explode?
- Memory and loading. Are textures, meshes, audio or scenes too heavy?
- Input support. Does the mechanic work with required keyboard, mouse, controller, touch or XR hardware?
- Readability. Is UI legible at target resolution and viewing distance?
- Build compatibility. Does it work in a built executable, not only in editor play mode?
- Engine version compatibility. Are packages, plugins and scripts compatible with the approved engine version?
Use the engine’s profiler, frame debugger, stats window, console logs and build reports where available. Do not rely only on “it feels fine on my machine”.
Optimising without damaging the design
Optimisation is a design trade-off. The aim is not to make everything low quality; it is to spend resources where they matter most.
For example:
- Use simple colliders instead of detailed mesh colliders for common props.
- Reduce texture resolution for small or distant objects.
- Use level of detail where supported for complex models.
- Limit real-time lights and shadow-casting objects.
- Avoid expensive per-frame searches across many objects.
- Pool frequently spawned objects such as projectiles or effects if creation costs are high.
- Use compressed audio appropriately, while keeping short repeated sound effects responsive.
A horror prototype may justify expensive lighting in one key corridor, but not on every background object. A driving prototype may justify detailed vehicle physics, but not fully simulated loose objects across the entire level.
Risk and critical path management
A risk is an uncertain issue that may affect the project. A critical path item is a task that must be completed on time because later work depends on it. Gameplay elements often contain both.
For example, if your prototype depends on a custom climbing system, that system may be on the critical path. Level design, animation and camera work depend on knowing how climbing behaves. If you leave it until the final week, the project may fail even if other assets are polished.
Manage this by:
- identifying high-risk mechanics early;
- building a proof of concept before polishing art;
- setting milestone review points;
- creating fallback options, such as a simpler ladder interaction;
- recording known issues and decisions;
- prioritising core playability over optional effects.
Workplace example
A Canberra defence training contractor is prototyping a 3-D equipment familiarisation tool. The creative requirement is accurate object inspection. The technical requirement is operation on secured desktop machines without high-end GPUs.
The team initially wants fully dynamic lighting and high-resolution models for every object. Profiling shows frame drops when several objects are viewed together. The technical designer reduces texture sizes on background assets, bakes static lighting where appropriate, uses simple colliders, and keeps the high-detail model only for the inspected item. The gameplay element still supports learning, but now meets the hardware constraint.
Common mistakes and contingencies
Do not postpone performance checks until the final presentation. Late optimisation can force rushed cuts to gameplay. Do not assume editor performance equals build performance; some builds run faster, but packaging, shader compilation, platform settings or missing assets can also introduce new problems.
If a required element is technically unstable, communicate early. Offer options: reduce scope, replace with a simpler mechanic, use placeholder feedback, or move the feature out of the current milestone. Professional judgement includes knowing when not to overbuild.
4.2 Quality checking gameplay elements
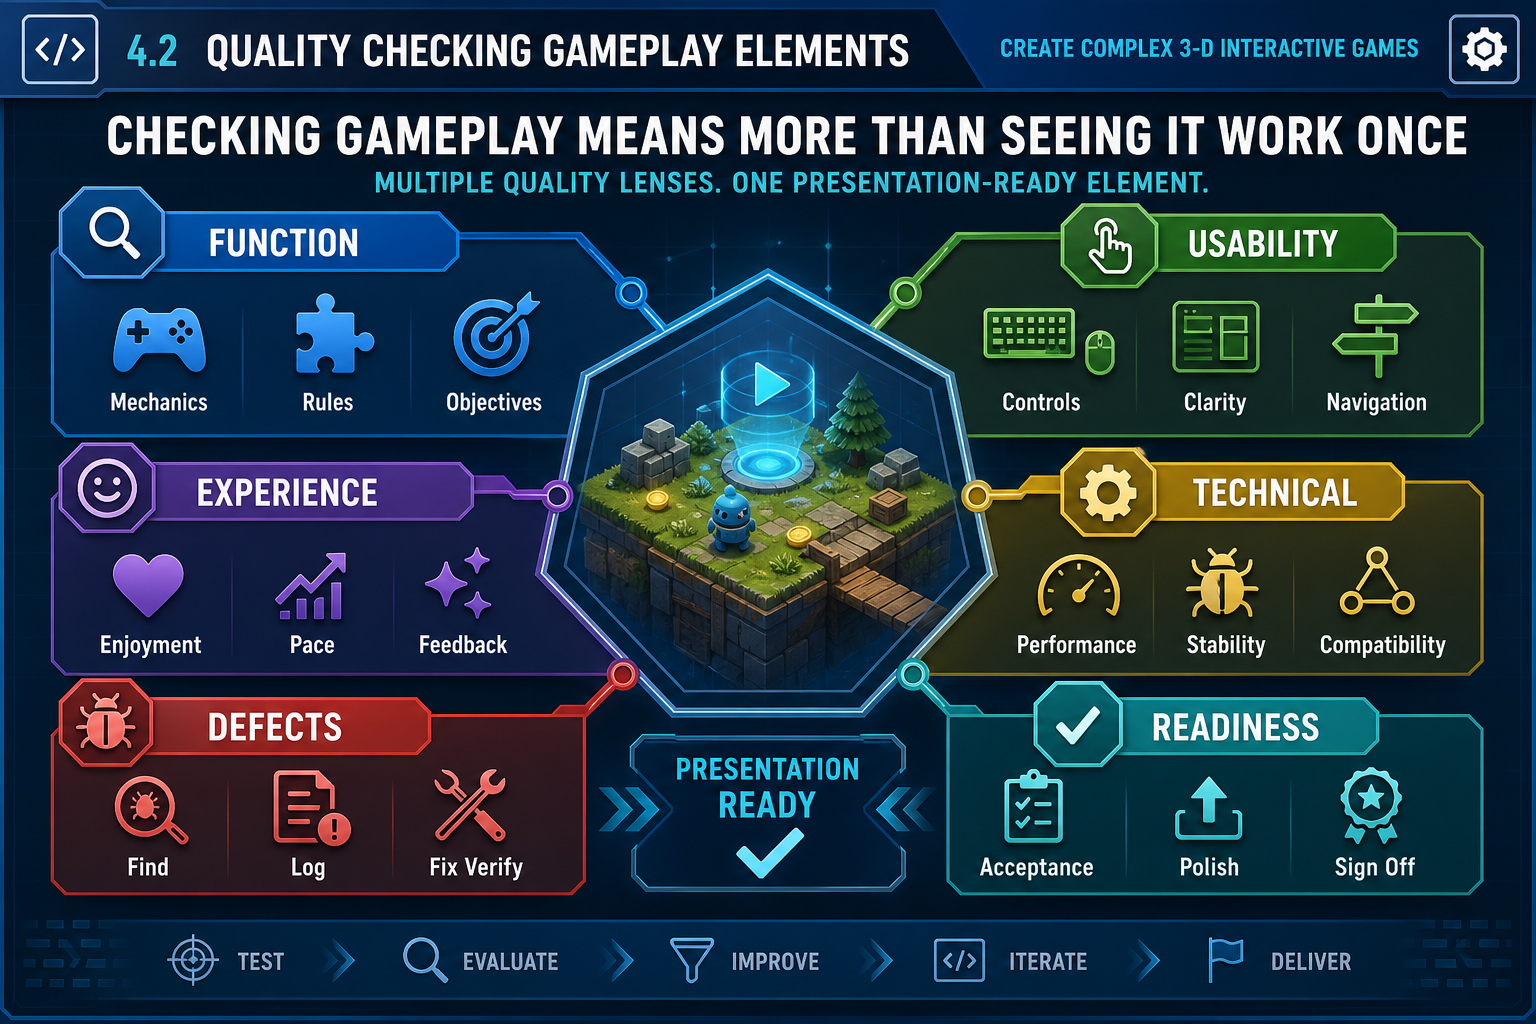
Checking is more than seeing if it works once
To “create and check” gameplay elements, you must verify that each element meets the brief under realistic conditions. A door opening once in the editor is not enough. You need to check function, feel, integration and constraints.
Use four quality lenses:
- Functional check: Does the mechanic perform the required rule correctly?
- Usability check: Can the player understand what to do and read the feedback?
- Experience check: Does it support the intended mood, pacing and challenge?
- Technical check: Does it run reliably on the target platform and within the engine constraints?
Creating test cases
A test case is a specific condition and expected result. It does not need to be complex, but it must be clear.
For a locked door, test cases might include:
- Player without key interacts: door remains closed, locked sound plays, prompt appears.
- Player with correct key interacts: door opens, key state updates if required, objective advances.
- Player with wrong key interacts: door remains closed and correct feedback appears.
- Player interacts repeatedly: door does not play overlapping animations or duplicate sounds.
- Player leaves and returns: door remains in the correct state.
- Scene restarts: door resets or loads saved state according to requirement.
These checks reveal issues that casual play may miss.
Scheduling checks during production
Testing should be scheduled, not squeezed in after building. Common scheduling techniques include:
- Task boards with columns such as To Do, In Progress, Ready for Test, Blocked and Done.
- Milestones such as greybox prototype, first playable, feature complete and presentation build.
- Timeboxing risky experiments so they do not consume the whole project.
- Bug triage to classify issues by severity and priority.
- Daily or weekly review notes for online teams to maintain shared understanding.
A gameplay element should not move to “done” until it passes its agreed acceptance checks or has documented exceptions approved by the relevant stakeholder.
Recording defects
When you find a defect, record enough information for someone else to reproduce it:
- title or summary;
- build or engine version;
- scene and object involved;
- steps to reproduce;
- expected result;
- actual result;
- severity and priority;
- screenshots, video or console log if useful;
- person assigned and status.
For example: “In Build 0.3, Scene Warehouse_A, if player collects blue key then restarts checkpoint, blue door opens without key. Expected: checkpoint restores key and door state consistently. Severity: high because it breaks puzzle sequence.”
Workplace example
A Hobart studio is creating a 3-D tourism game prototype. One gameplay element is a guided path through a historical site. The creative requirement is calm exploration; the production requirement is a client demonstration next Wednesday; the technical requirement is a Windows build played with controller.
During checking, the team finds that keyboard controls work but controller prompts do not update. The path marker also disappears behind bright surfaces. Instead of marking the feature complete, the team records defects, updates UI prompt logic, adjusts marker contrast, and retests in a packaged build. This is the difference between editor-only progress and presentation-ready gameplay.
Common mistakes
Do not test only the happy path. Players press the wrong button, approach from odd angles, repeat actions, leave areas early and trigger systems in unexpected orders. Also avoid fixing defects without retesting related systems. A change to player input may affect doors, pickups, menus and dialogue.
Do not ignore small polish issues if they affect comprehension. A missing sound may not crash the game, but it can make an interaction feel unresponsive. Conversely, do not spend hours polishing a particle effect while a critical objective sequence is broken. Use severity, priority and milestone context to decide.